Cisco Route : PPP

By default Cisco uses HDLC encapsulation on Serial interfaces. We are going to setup a simple PPP link with Authentication.

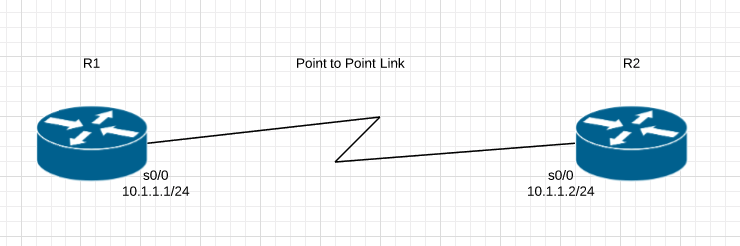
R1#show int serial 0/0   

Serial0/0 is up, line protocol is up

  Hardware is GT96K Serial

  Internet address is 10.1.1.1/24

  MTU 1500 bytes, BW 1544 Kbit/sec, DLY 20000 usec,

     reliability 255/255, txload 1/255, rxload 1/255

  Encapsulation HDLC, loopback not set

  Keepalive set (10 sec)

  Last input 00:00:09, output 00:00:07, output hang never

  Last clearing of "show interface" counters never

  Input queue: 0/75/0/0 (size/max/drops/flushes); Total output drops: 0

  Queueing strategy: weighted fair
R2#show int serial 0/0

Serial0/0 is up, line protocol is up

  Hardware is GT96K Serial

  Internet address is 10.1.1.2/24

  MTU 1500 bytes, BW 1544 Kbit/sec, DLY 20000 usec,

     reliability 255/255, txload 1/255, rxload 1/255

  Encapsulation HDLC, loopback not set

  Keepalive set (10 sec)

  Last input 00:00:05, output 00:00:06, output hang never

  Last clearing of "show interface" counters never

  Input queue: 0/75/0/0 (size/max/drops/flushes); Total output drops: 0

  Queueing strategy: weighted fair

We have to change that to PPP encapsulation on both sides, other wise there will be a encapsulation mismatch and the Interface will remain up but the line protocol will be down.

R1(config-if)#encapsulation ?

  frame-relay  Frame Relay networks

  hdlc         Serial HDLC synchronous

  lapb         LAPB (X.25 Level 2)

  ppp          Point-to-Point protocol

  smds         Switched Megabit Data Service (SMDS)

  x25          X.25
R1(config-if)#encapsulation ppp
R1(config-if)#

*Mar  1 00:05:27.739: %LINEPROTO-5-UPDOWN: Line protocol on Interface Serial0/0, changed state to down

R1(config-if)#exit                             

R1(config)#exit

R1#sh int serial 0/0

Serial0/0 is up, line protocol is down 

  Hardware is GT96K Serial

  Internet address is 10.1.1.1/24

  MTU 1500 bytes, BW 1544 Kbit/sec, DLY 20000 usec,

     reliability 255/255, txload 1/255, rxload 1/255

  Encapsulation PPP, LCP Listen, loopback not set
R2(config)#int serial 0/0

R2(config-if)#encapsulation ppp

R2(config-if)#exit

R2(config)#exit

R2#sh int serial 0/0

Serial0/0 is up, line protocol is up 

  Hardware is GT96K Serial

  Internet address is 10.1.1.2/24

  MTU 1500 bytes, BW 1544 Kbit/sec, DLY 20000 usec,

     reliability 255/255, txload 1/255, rxload 1/255

  Encapsulation PPP, LCP Open

We should move from HDLC to PPP because PPP has some features that HDLC doesn’t for example, Authentication options, error detection and error recovery features.

Password Authentication Protocol (PAP)  and  Challenge Authentication Protocol (CHAP)

PAP is very passive authentication, where as CHAP actively asks who are you?

PAP also sends username and password in Clear Text.

Here is how to configure CHAP on both routers

The username is the Hostname of the Peer Router you are authenticating to. The passwords must match.

R1(config)#username R2 password TPW

R1(config)#int serial 0/0

R1(config-if)#ppp authentication chap


R2(config)#username R1 password TPW

R2(config)#int serial 0/0

R2(config-if)#ppp authentication chap

Most likely if there is a issue its with the passwords mismatching, but you can always use the command:

R1#debug ppp authentication

The Packet Wizard : Multicast

This week I have been troubleshooting a Multicast problem, before Tuesday I knew the basics of it but I did not realize how deep that rabbit hole went, I can only imagine how deep it goes in CCIE level since it has not really crossed my path in any of my studies thus far. I thought I should write this blog post to share what I have learned this week about Multicast. I will also write another post on how to configure and troubleshoot it.

What is Multicast?

Multicast is a group communication where data packets are sent to a group of receiver/destination computers at the same time. Multicast is one to many or many to many real time communication protocol, where Unicast is one to one and Broadcast is one to all. Multicast is mainly used in IPTV (Netflix, Hulu, Prime Video).

Multicast Address Ranges


They use Class D Range – 224.0.0.0 – 239.255.255.255

224.0.0.0 224.0.0.255 – Reserved for Local Addresses

224.0.1.0 – 238.255.255.255 – Globally Scoped Addresses

232.0.0.0 – 232.255.255.255 – Source Specific Multicast Addresses

233.0.0.0 – 233.255.255.255 – GLOP Addresses

239.0.0.0 – 239.255.255.255 – Limited Scope Address (Similar to Private IP addresses but for Multicast)


How does Multicast Work?

The Receiver sends a packet to the Router asking to Join the Multicast Group. Only the clients that want to receive Multicast join what is called a Multicast Group. If the router doesn’t know about it it will send requests out its next hop interface.

Protocol Independent Multicast (PIM) Think of this like a multicast routing protocol sits on top of the Internet Group Management Protocol (IGMP) and builds a pipe back to the source from the destination. There are 3 versions of IGMP:

IGMPv1 – has a 60 second timer and continually asks.
IGMPv2 – can send an I want to leave the multicast group message to the router.
IGMPv3 – can include a source in the join packets.

If the multicast sender has multiple paths to the receiver it will send the multicast multi ways meaning the receiver will receive duplicate messages. The receiver then has to send the reply but it uses the unicast routing table to return the traffic and uses that interface.


Reverse Path Forwarding (RPF) is a check that the receiving device does before the sender sends anything so it knows how to get back to get back to the sender without receiving multiple multicast messages.


Multicast Types

I am sure there are more than two types of multicast but all I have covered are Sparse and Dense mode.

Sparse Mode is like a Join Protocol, where traffic is not forwarded on a segment unless it is explicitly requested. Sparse mode is typically deployed where the receivers are sparsely populated over the network, so that most of the network bandwidth is conserved.

Dense Mode is like a flood and prune system, where everyone receives the traffic until they inform (through the prune system) that they do not want that particular multicast messages. Dense Mode is typically deployed in topologies where listeners are densely populated, but it can be a very chatty protocol.

You can setup sparse mode or dense mode on a per interface basis. Once they are setup and enabled interfaces can run sparse mode while others run dense mode.

A Networking genius (Denise Fishburne – https://www.networkingwithfish.com/ ) said on a training video I watched yesterday “Friends don’t let friends do dense mode”. Denise also recently started following my blog, which is a huge honor. I hope this post is doing some basic justice to Multicast. I am trying to share information I have gathered in the last couple of days. If anyone has any comments or further insight let me know.


Cisco Router : RIPng

RIP is a IPv4 Routing Protocol and RIPng is an extension of RIP developed to support IPv6. RIP and RIPng are known as Distance Vector Protocols. They use HOP counts as their metric for determining the best path. Here is some basic information for RIP and RIPng

FEATURE RIP RIPng
Advertised Routes IPv4 IPv6
Transport Protocol UDP 520 UDP 521
Multicast Address 224.0.0.9 FF02::9
VLSM Support Yes Yes
Metric Hop Count (Max 15) Hop Count (Max 15)
Administrative Distance 120 120
Routing Updates Every 30 Seconds and with each topology change Every 30 Seconds and with each topology change
Supports Authentication Yes Yes

RIPng is part of the CCNP Route exam, and even although I have not see it used in production, I have however heard of it being used in UNIX environments. It tends not to be used because it is super chatty, its not very scaleable and is based on the Bellman-Ford algorithms which is prone to routing loops and count to infinity issues.

Here is an overview of the basic topology we will be using:

The Steps to configure RIPng:
1. Enable IPv6 Routing
2. Create RIPng Routing Process
3. Enable IPv6 on the interface
4. Enable RIPng on the interface

Here is the configuration steps to enabling RIPng on R1

TPW-R1# conf t
TPW-R1 (config)# ipv6 unicast routing
TPW-R1 (config)# ipv6 router rip TPW_RIP

Complete the steps on R2

TPW-R2# conf t
TPW-R2 (config)# ipv6 unicast routing
TPW-R2 (config)# ipv6 router rip TPW_RIP

You can see the RIPng Routing Protocol is running 

TPW-R1#show ipv6 protocols 
IPv6 Routing Protocol is "connected"
IPv6 Routing Protocol is "static"
IPv6 Routing Protocol is "rip TPW_RIP"
  Interfaces:
    None
TPW-R2#show ipv6 protocols 
IPv6 Routing Protocol is "connected"
IPv6 Routing Protocol is "static"
IPv6 Routing Protocol is "rip TPW_RIP"
  Interfaces:
    None

Although the you can see RIPng is not enabled on any interfaces.

To enable it on the interfaces complete the following commands

TPW-R1#conf t
TPW-R1(config)#int fa0/0
TPW-R1(config-if)#ipv6 rip TPW_RIP enable
TPW-R1(config-if)#int loopback 1        
TPW-R1(config-if)#ipv6 rip TPW_RIP enable

Complete on the 2nd Router

TPW-R2#conf t
TPW-R2(config)#int fa0/0
TPW-R2(config-if)#ipv6 rip TPW_RIP enable
TPW-R2(config-if)#int loopback 1        
TPW-R2(config-if)#ipv6 rip TPW_RIP enable

You can now see the interfaces are running RIPng

TPW-R1#show ipv6 protocols 
IPv6 Routing Protocol is "connected"
IPv6 Routing Protocol is "static"
IPv6 Routing Protocol is "rip TPW_RIP"
  Interfaces:
    Loopback1
    FastEthernet0/0

TPW-R2#show ipv6 protocols 
IPv6 Routing Protocol is "connected"
IPv6 Routing Protocol is "static"
IPv6 Routing Protocol is "rip TPW_RIP"
  Interfaces:
    Loopback1
    FastEthernet0/0

Verify all the routes are in the routing table

TPW-R1#show ipv6 route
IPv6 Routing Table - 7 entries
Codes:
C - Connected, L - Local, S - Static, R - RIP, B - BGP
U - Per-user Static route
I1 - ISIS L1, I2 - ISIS L2, IA - ISIS interarea, IS - ISIS summary
O - OSPF intra, OI - OSPF inter, OE1 - OSPF ext 1,OE2 - OSPF ext 2
ON1 - OSPF NSSA ext 1, ON2 - OSPF NSSA ext 2

C   1111::/64 [0/0]    
via ::, FastEthernet0/0
L   1111::1/128 [0/0]
via ::, FastEthernet0/0
C   2222::/64 [0/0]
     via ::, Loopback1
L   2222::1/128 [0/0]
     via ::, Loopback1
R   3333::/64 [120/2]
     via FE80::C602:52FF:FE37:0, FastEthernet0/0

Verify on the second Router

TPW-R2#show ipv6 route
IPv6 Routing Table - 7 entries

Codes:
C - Connected, L - Local, S - Static, R - RIP, B - BGP
U - Per-user Static route
I1 - ISIS L1, I2 - ISIS L2, IA - ISIS interarea, IS - ISIS summary
O - OSPF intra, OI - OSPF inter, OE1 - OSPF ext 1, OE2 - OSPF ext 2
ON1 - OSPF NSSA ext 1, ON2 - OSPF NSSA ext 2

C   1111::/64 [0/0]
     via ::, FastEthernet0/0
L   1111::2/128 [0/0]
     via ::, FastEthernet0/0
R   2222::/64 [120/2]
     via FE80::C601:52FF:FE34:0, FastEthernet0/0
C   3333::/64 [0/0]
     via ::, Loopback1
L   3333::1/128 [0/0]
     via ::, Loopback1

We need to verify connectivity TPW-R1

TPW-R1#ping ipv6 1111::1
Type escape sequence to abort.
Sending 5, 100-byte ICMP Echos to 1111::1, timeout is 2 seconds:
!!!!!
Success rate is 100 percent (5/5), round-trip min/avg/max = 0/0/4 ms

TPW-R1#ping ipv6 1111::2
Type escape sequence to abort.
Sending 5, 100-byte ICMP Echos to 1111::2, timeout is 2 seconds:
!!!!!
Success rate is 100 percent (5/5), round-trip min/avg/max = 28/28/28 ms

TPW-R1#ping ipv6 2222::1
Type escape sequence to abort.
Sending 5, 100-byte ICMP Echos to 2222::1, timeout is 2 seconds:
!!!!!
Success rate is 100 percent (5/5), round-trip min/avg/max = 0/2/4 ms

TPW-R1#ping ipv6 3333::1
Type escape sequence to abort.
Sending 5, 100-byte ICMP Echos to 3333::1, timeout is 2 seconds:
!!!!!

Finally, We need to verify connectivity TPW-R2

TPW-R2#ping ipv6 1111::1
Type escape sequence to abort.
Sending 5, 100-byte ICMP Echos to 1111::1, timeout is 2 seconds:
!!!!!
Success rate is 100 percent (5/5), round-trip min/avg/max = 0/0/4 ms

TPW-R2#ping ipv6 1111::2
Type escape sequence to abort.
Sending 5, 100-byte ICMP Echos to 1111::2, timeout is 2 seconds:
!!!!!
Success rate is 100 percent (5/5), round-trip min/avg/max = 28/28/28 ms

TPW-R2#ping ipv6 2222::1
Type escape sequence to abort.
Sending 5, 100-byte ICMP Echos to 2222::1, timeout is 2 seconds:
!!!!!
Success rate is 100 percent (5/5), round-trip min/avg/max = 0/2/4 ms

TPW-R2#ping ipv6 3333::1
Type escape sequence to abort.
Sending 5, 100-byte ICMP Echos to 3333::1, timeout is 2 seconds:
!!!!!
Success rate is 100 percent (5/5), round-trip min/avg/max = 8/23/28 ms

RIPng is fully configured and working.

Note that using FE80::1 link-local and FE80:2 link-local – for point to point its a lot easier to ping – unique link local on every router and interface, I just wanted to make it a bit easier to see by using 1111::1 and 2, 2222 and 3333

The Packet Wizard : Today I begin the CCNP R&S


Notice: Trying to access array offset on value of type null in /home/minted6/thepacketwizard.com/wp-content/plugins/amazon-associates-link-builder/vendor/mustache/mustache/src/Mustache/Parser.php on line 278

Today, I officially start the CCNP Route Switch Course.

I have purchased the following book set, I have provided a link if you wish to purchase them:

I am also using Chris Bryant’s Video Udemy Course (Who helped me pass the CCNA R&S and Security, very thorough video series) and I will try and get his books. I have provided a link if you wish to purchase them :

https://www.udemy.com/ccnpallinone/

I plan to have passed the CCNP Switch by July, because I have some pretty big work trips coming up and I know that is going to get in the way a little. However the 18hr flight to Singapore, I should be able to get through a power of reading and labs 🙂

I will start to blog on my progress and things I am learning.

Wish me Luck!

Cisco : Enable SSH on Cisco Switch, Router and ASA

When you configure a Cisco device, you need to use a console cable and connect directly to the system to access it. Follow the SSH setup below, will enable SSH access to your Cisco devices, since SSH is not enabled by default. Once you enable SSH, you can then access it remotely using SecureCRT or any other SSH client.

Set hostname and domain-name

The hostname has to have a hostname and domain-name.

switch# config t
switch(config)# hostname tpw-switch
tpw-switch(config)# ip domain-name thepacketwizard.com

Setup Management IP

In the following example, the management ip address will be set to 10.100.101.2 in the 101 VLAN. The default gateway points to the firewall, which is 10.100.101.1

tpw-switch# ip default-gateway 10.100.101.1
tpw-switch# interface vlan 101
tpw-switch(config-if)# ip address 10.100.101.2 255.255.255.0

Generate the RSA Keys

The switch or router should have RSA keys that it will use during the SSH process. So, generate these using crypto command as shown below.

tpw-switch(config)# crypto key generate rsa
  The name for the keys will be: tpw-switch.thepacketwizard.com
  Choose the size of the key modulus in the range of 360 to 2048 for your
    General Purpose Keys. Choosing a key modulus greater than 512 may take
    a few minutes.

How many bits in the modulus [512]: 1024
  % Generating 1024 bit RSA keys, keys will be non-exportable...[OK]

Setup the Line VTY configurations

Setup the following line vty configuration, where input transport is set to SSH only. Set the login to local, and password to 7, and make sure Telnet is not enabled:

tpw-switch# line vty 0 4
 tpw-switch(config-line)# transport input ssh
 tpw-switch(config-line)# login local
 tpw-switch(config-line)# password 7
 tpw-switch(config-line)# exit

If you have not set the console line yet, use the following:

tpw-switch# line console 0
tpw-switch(config-line)# logging synchronous
tpw-switch(config-line)# login local

Create the username password

If you don’t have an username created already, here is how:

tpw-switch# config t
Enter configuration commands, one per line.  End with CNTL/Z.
tpw-switch(config)# username thepacketwizard password tpwpassword123
tpw-switch# enable secret tpwenablepassword

Make sure the password-encryption service is turned-on, which will encrypt the password, and when you do “show run”, you’ll see only the encrypted password and not clear-text password.

tpw-switch# service password-encryption

Verify SSH access

From the switch, if you do ‘show ip ssh’, it will confirm that the SSH is enabled on this Cisco device.

tpw-switch# show ip ssh
 SSH Enabled - version 1.99
 Authentication timeout: 120 secs; Authentication retries: 3

After the above configurations, login from a remote machine to verify that you can ssh to this cisco switch.

In the example, 10.100.101.2 is the management ip-address of the switch.

TPW-Remote-Computer# ssh 10.100.101.2
 login as: thepacketwizard
 Using keyboard-interactive authentication.
 Password:

tpw-switch>en
 Password:
 tpw-switch#

You are now setup and logged in on SSH!

To read more on SSH visit: https://en.wikipedia.org/wiki/Secure_Shell

Data Centre : Post DC Move Unracking

We moved our company internal Data Centre to a COLO Facility 2 weeks ago, here is what is left. Before and After Pictures, as well as a photo of the “Boneyard”. A pretty good haul for E-Wasting:

2x Cisco 6909’s

3x Cisco 6513’s

8x Cisco ASA’s

2x Brocade Loadbalancers

4x Cisco 2900 Routers

2x Cisco Nexus 5k

1x Cisco Wireless LAN Controller


GNS3 : Install and Configure

This install is intended for running IOU/IOL images on the GNS3 VM because it is the preferable way of running IOS in GNS3 now.

Pre-Requisites:

  1. Install VMware Workstation Player
    http://www.vmware.com/products/player/playerpro-evaluation.html
  2. Install VMware VIX API
    https://www.vmware.com/support/developer/vix-api/
  3. Install Wireshark
    https://www.wireshark.org/download.html
    Install WinPCAP provided by Wireshark


Install GNS3:

  1. Install GNS3
    https://www.gns3.com/software/download
  2. Install only the following components:

  1. We don’t need Dynamips/QEMU/VPCS/Cpulimit because we’ll be running everything off of the GNS3 VM server.  We don’t install SuperPutty from here because its not the latest version and the first thing it does when you open it is bug you about upgrading to the latest version.  There are setup instructions for it below.

Install Loopback Adapter

  1. Open an Admin Command Prompt

cd “c:\Program Files\gns3”

loopback-manager.cmd

  1. Install a new Loopback interface (reboot required)
  2. Reboot
  1. Rename the new Loopback adapter to “Loopback”
  2. Assign it an IP address


Setup GNS3 VM:

  1. Download the GNS3 VM version that matches the installed GNS3 version
    https://github.com/GNS3/gns3-gui/releases
  2. Import the VM and keep the defaults
  3. Add a 3rd Network Adapter that will be in Bridged mode and connected to the Loopback adapter (Microsoft KM-TEST Loopback Adapter)

  1. Power on the VM
  2. SSH into the VM using gns3/gns3 for the credentials
    1. Sudo to root and run the following:
      1. echo ‘127.0.0.127 xml.cisco.com’ >> /etc/hosts
  3. Leave the VM powered on, we’re done with it for now
  4. Open an Administrator command prompt
  5. cd into the GNS3 install directory and run the following:
    1. IMPORTANT: On my work laptop, added the additional interfaces broke network connectivity to the VM after they were added.  I have no idea why but after I reinstalled VMware Workstation which uninstalled all the adapters, I was able to connect to the VM again.  On the work laptop, I’m running without the additional adapters and it seems fine so far.
    2. vmnet-manager.cmd
    3. Select option 1 which will add the vmnet interface 2 to 19 (this can take a while, please be patient)
    4. If it looks like this process has hung, you follow step 2 in the url below to add the adapters
      https://www.gns3.com/support/docs/how-to-use-vmware-player-in-gns3


Configure GNS3 to use the GNS3 VM server:

  1. Open up GNS3
  2. Goto Edit > Preferences

    Be sure to leave “Start VM in headless mode” unchecked.  I ran into issues where the VM would not automatically startup when opening GNS3 and also cause the GNS3 process to linger when closing out of it.
  3. Disable “Use of the local server” for Dynamips and QEMU.  We’ll use the GNS3 VM instead for running those processes.

Packet capture VPCS Dynamips IOS routers General settings Use the local server Path to Dynamips:


Create the L2/L3 IOU Devices:

  1. Goto Edit > Preferences
  2. Set the iourc file to use with the license (IOU devices need a license to run)
  3. Create the L2 image:
  4. Create the L3 image:

Add Device Image

New appliance template > Add and IOU > Run the IOU > New Image > Browse


i86bi-linux-l2-ipbasek9-15.1e.bin – IOU-L2

i86bi-linux-l3-adventerprisek9-15.4.2T.bin – IOU-L3


Operational Notes:

  • Sometimes a restart of all the routers/switches are required when new links are created between devices.  Even though the line protocols show as up, I’ve found a restart is required for traffic to actually pass through them.


If you want to use SuperPutty as the SSH client for GNS3 click this link:
SuperPutty with GNS3

Cisco : Serial Numbers

Today I have spent some time trying to find serial numbers on multiple Cisco devices, some Routers, Switches, Firewalls and Wireless LAN Controllers. Here is 7 ways I have found:

  1. Locate the serial number tag on the device chassis.
  2. The serial number is displayed in the banner during boot.
  3. “show version” command. (Look for Processor board ID or S/N)
  4. “show inventory” command. (Look for Hw Serial# or SN:)(Also works on WLC’s)
  5. “show diag” command. (Look for Chassis Serial Number)
  6. “show hardware” command. (Look for Processor board ID or S/N)
  7. “show tech-support” command.