Ruckus : Using Multiple RADIUS Servers

I have recently been configuring Network Access Control with 802.1x, and I had been having issues with using multiple RADIUS servers on Ruckus ICX Switches. The main issue being:

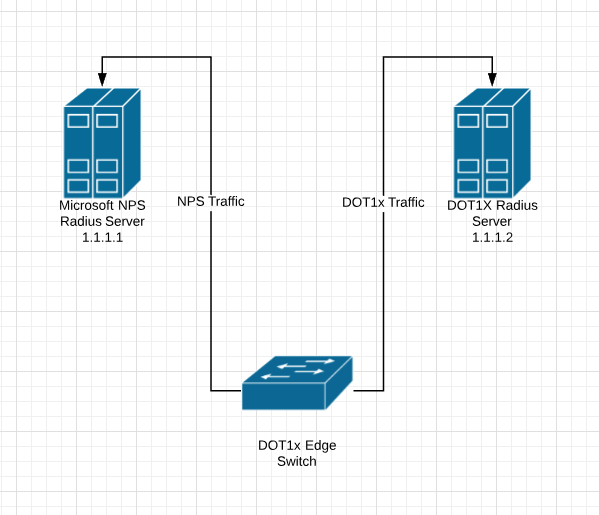
RADIUS Authenticate over SSH to switch using Microsoft NPS RADIUS Server
RADIUS Authenticate using 802.1x or MAC-Auth using DOT1x RADIUS Server

In Ruckus ICX switches there isn’t any concept of AAA groups like in Cisco, where you can designate specific RADIUS traffic to go to various different RADIUS Servers.
I have found 2 work arounds, I did however also call support and spend 1 hour troubleshooting with them and they didn’t have an answer for me.

Some Basic Setup Information

Microsoft NPS RADIUS Server : 1.1.1.1
DOT1x RADIUS Server : 1.1.1.2

Here are my AAA Authentication Commands:

SSH@tpw-sw1# sh run | inc authentication
aaa authentication web-server default radius local
aaa authentication enable default radius local
aaa authentication dot1x default radius
aaa authentication login default radius local

Here are my 2 work arounds:

WORKAROUND 1

SSH@tpw-sw1(config)# radius-server host 1.1.1.1 auth-port 1812 acct-port 1813 default key RADIUS1SECRET
SSH@tpw-sw1(config)# radius-server host 1.1.1.2 auth-port 1812 acct-port 1813 default key RADIUS2SECRET dot1x mac-auth

If you use the 1.1.1.2 RADIUS server first in the list you cannot authenticate to the switch at all, even over super-user-password. So the only way I have it working is to have the DOT1x Radius Server listed 2nd but calling out DOT1x and MAC-AUTH.

WORKAROUND 2

The other method I found is to apply a command at the interface level:

SSH@tpw-sw1# conf t
SSH@tpw-sw1(config)# int ethernet 1/1/1
SSH@tandy-lab-sw1(config-if-e1000-1/1/1)#use-radius-server 1.1.1.2

I hope that this helps, I spent a day trying to figure it out 🙂


The Packet Wizard : Migrating from Cisco 6500 to Ruckus ICX

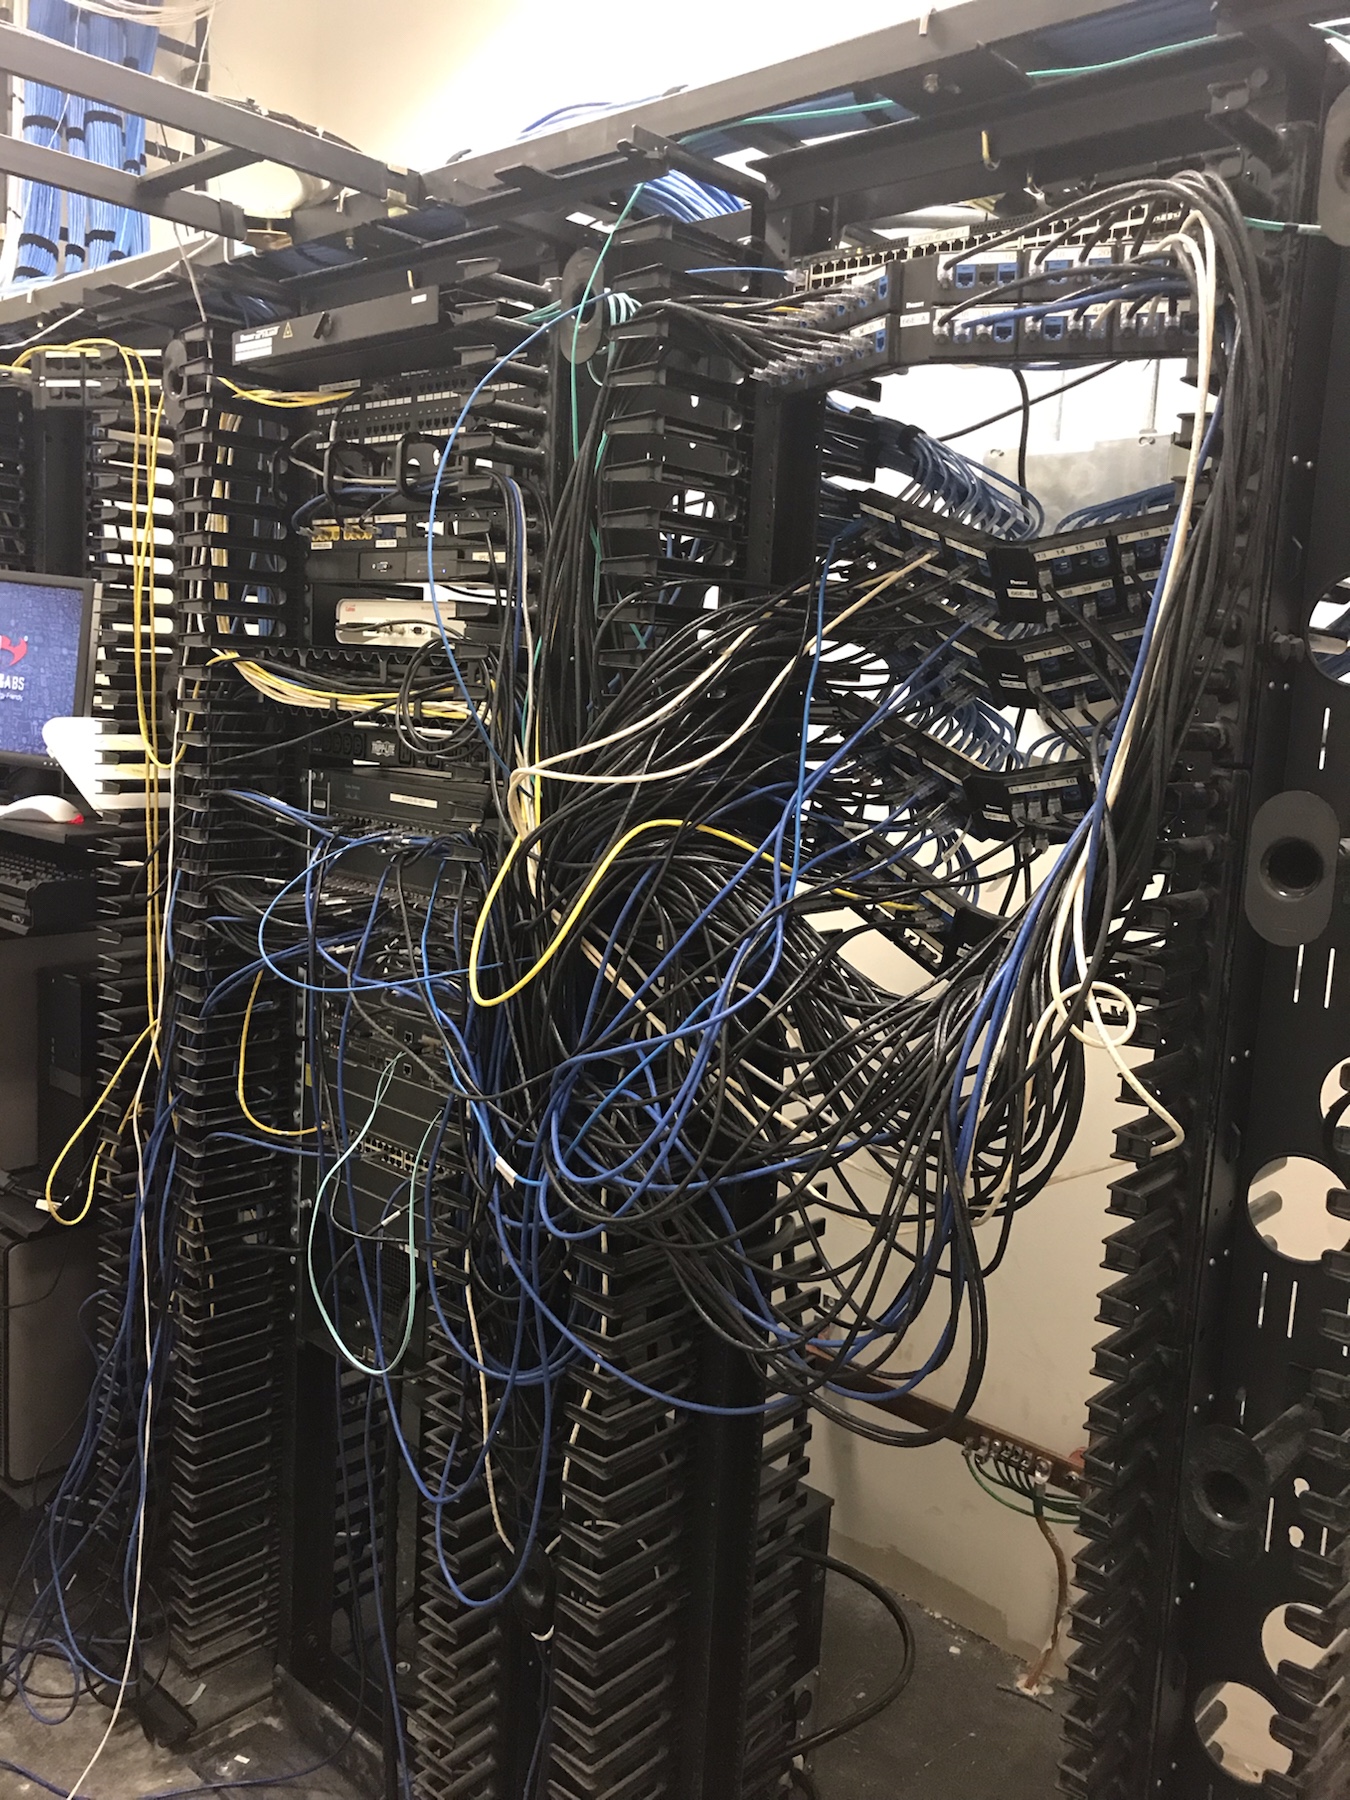
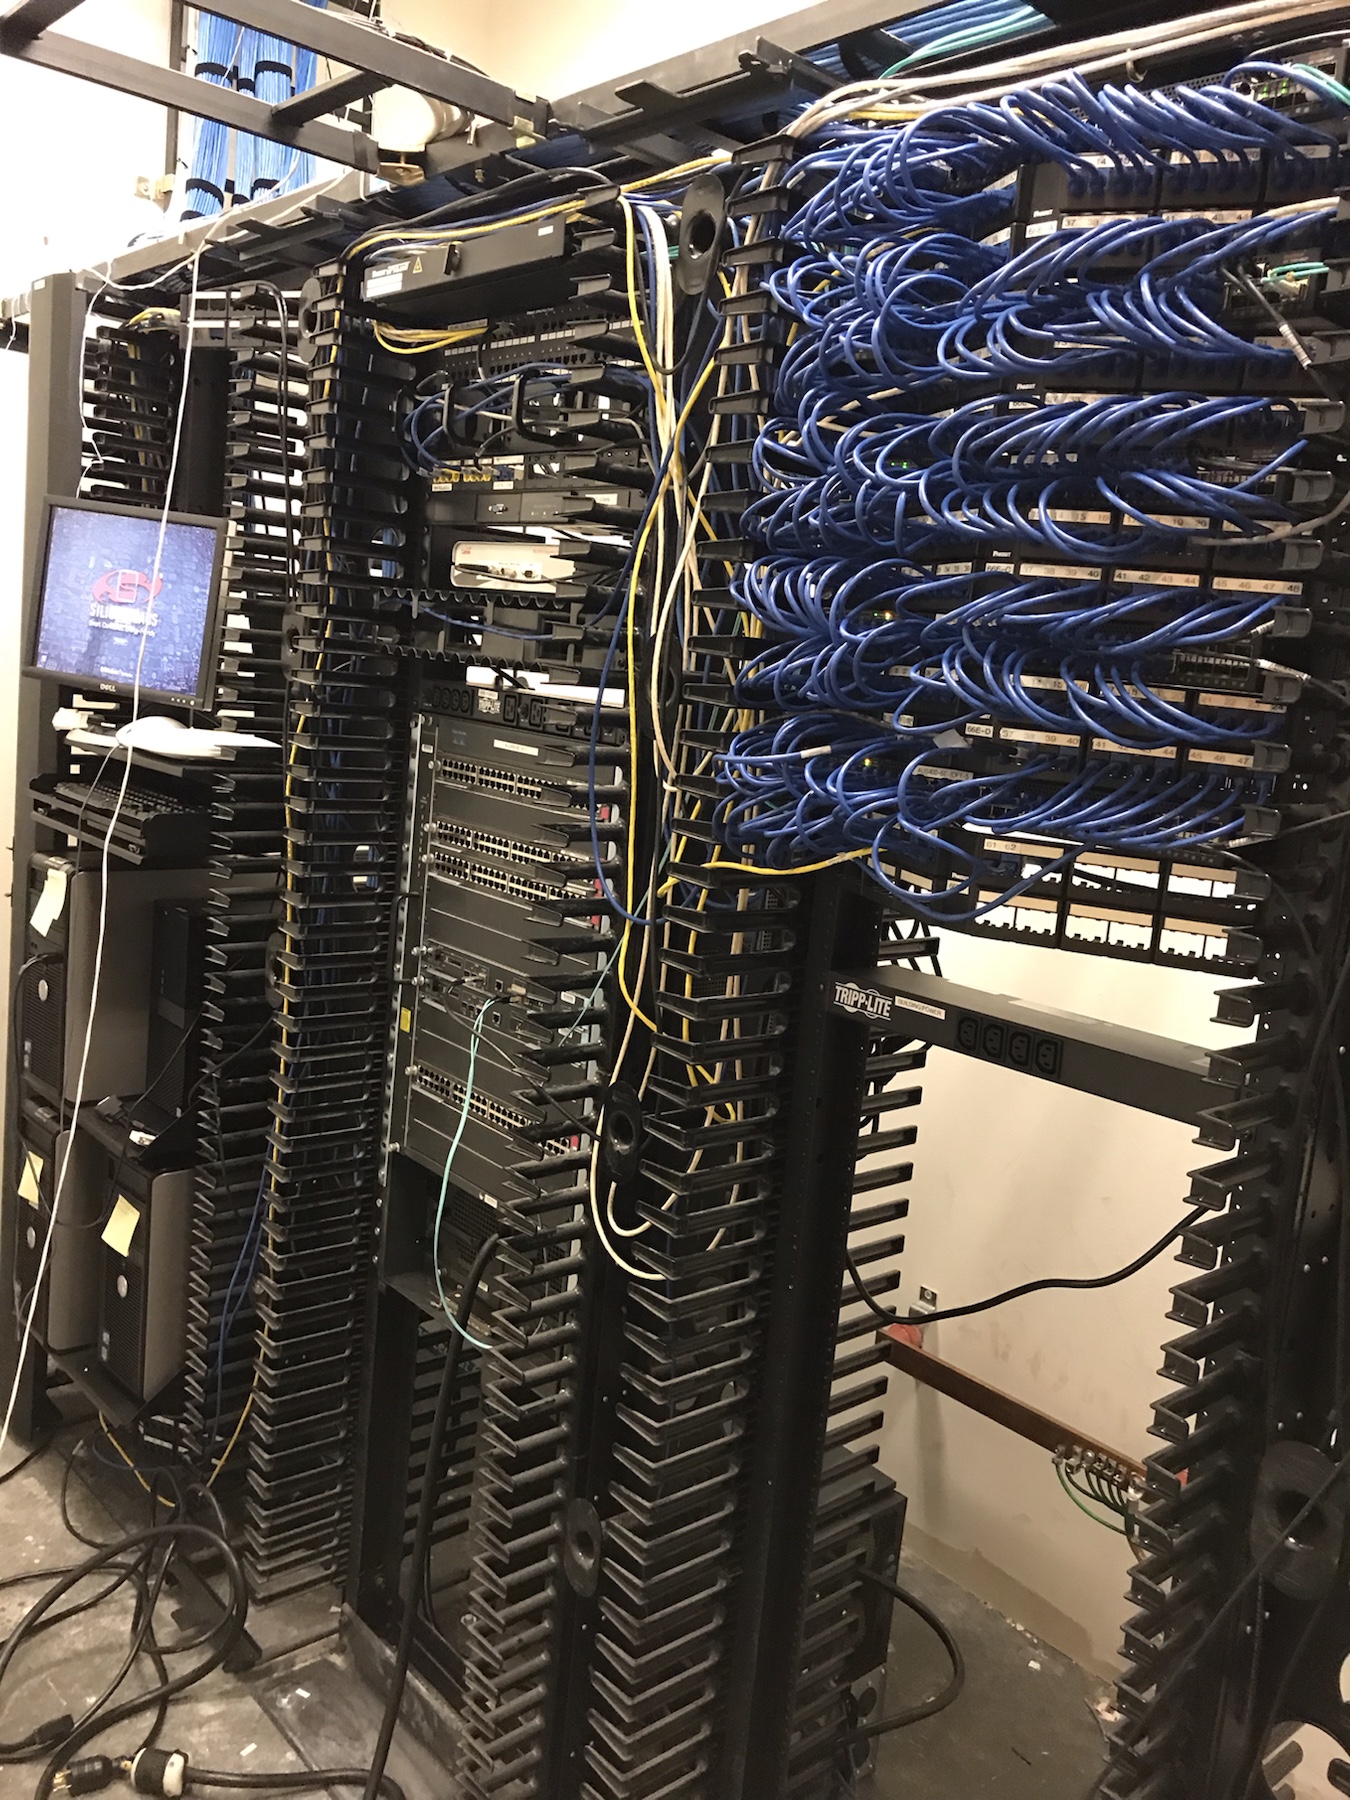
Just a quick post this week, I have been busy migrating from Cisco 6500 to Ruckus ICX. Here are some before and after photos and a video of the all important turn off. The main thing I learned in this migration is to chose your ports that are different, do Trunk Ports, Wireless, Printers, anything that is unique or requires a slightly different configuration do them first, then the regular desktop/user ports are just easy swaps.

The before picture we had already started to move the patch panels.

Listen to that power noise drop when it turns off. Turning off Cisco 6500 after Migration

Ruckus : Configure Link Aggregation Group

This is how to build a Link Aggregation Group on the Ruckus 7150. It is slightly different on the 7250’s.


tpwsw1# conf t


Configure the Link Aggregation Group. There are multiple LAG types and they must match on both sides of the lag, other vendors may use different names for the same thing here are the common ones:

Ruckus LAG Types Other Vendor Types
Static On
Dyanmic Active

Configure a static LAG.

tpwsw1(config)# lag <name-of-the-lag> static id 1


Configure a dynamic LAG.

tpwsw1(config)# lag <name-of-the-lag> dynamic id 1


The LAG ID can be automatically generated and assigned to a LAG using the auto option.

tpwsw1(config)# lag <name-of-the-lag> dynamic id auto


The Link Aggregation Group IDs are unique for each LAG on the switch. The LAG ID can’t be assigned to more than one LAG. If a LAG ID is already used, the CLI will reject the new LAG configuration and display an error message that suggests the next available LAG ID that can be used.

Once the LAG is built you have to add ports to the LAG.

tpwsw1(config-lag-<name-of-the-lag>)# ports ethernet 1/2/7 ethernet 1/2/8


Ruckus : L3 Routing Image on Switch

There are 2 different versions of code for the ICX switches depending on what you are doing with them. Layer 3 or Layer 2. If you are going to be doing L3, you will need a license for that.

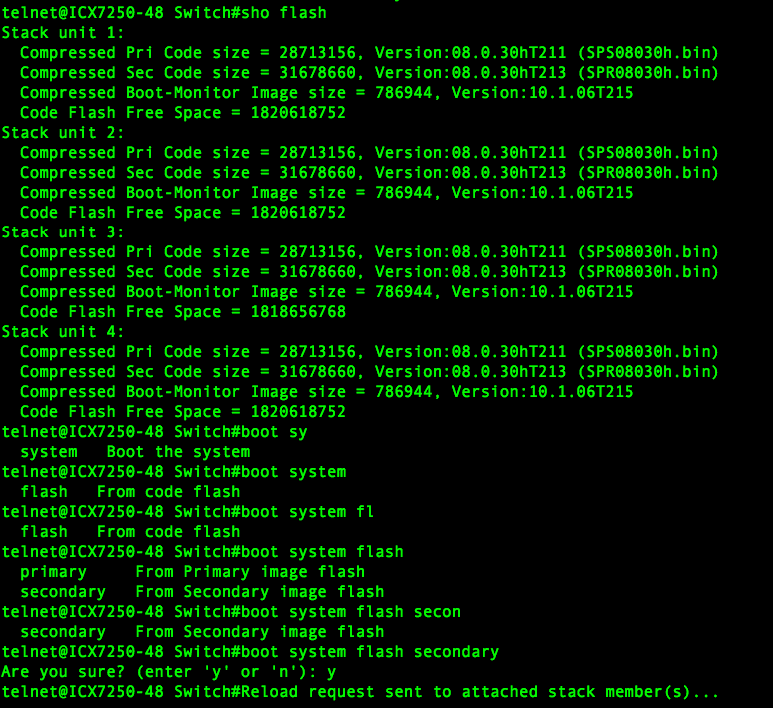
Software on the device is listed within:


 #show flash


SPS – S is for Switching

SPR – R is for Routing

Ruckus Recommend if you are using L3 then to boot the system to SPR.

Once it has rebooted do not forget to make sure you set it to boot from the Router image if the switch was to reboot for any reason. (make sure you are in configure terminal mode or you will cause a reboot)

Avoid this!!!

This is correct in (config) mode

Ruckus : Licensing with TFTP & USB

This topic in my opinion is one of the really big downfalls of the Ruckus Switches and there are a couple, but I will leave that for another time. Licensing however, It is overly complicated, and a total waste of time. Why when you buy a piece of hardware it doesn’t come working the way you want it to, is beyond me. Ruckus have to fix this or they will lose customers. They recently told me that they had delivered 42 ICX switches to a customer. When I thought about the licensing process that needs to be done on each device, I think I would have quit on the spot. Luckily…I only had to license 4…for now. This however is not normal practice,  Here Goes:

When you buy a license key wether it be for Layer 3 or 10G ports you need a transaction key and then you need a License ID.

To get the LicenceID you need to run the command:

#show version

The you need to go to https://support.ruckuswireless.com/code_registration (you will need a ruckus account for this). The License Code comes in a separate Email (if you don’t receive that you may need to contact support). Follow the steps online:


They then have you download a file or they will send you a xml file.
(I recommend opening up the XML file and naming them something better than what they send you).

For USB Install

Copy the XML License Files to USB Stick

View Current License

#Show license

View License files on USB on Switch

# show files disk0

Copy license files from USB to Switch

#Copy disk0 license <license-filename> unit <switch-number>

For TFTP Install

Copy files from TFTP Server to Switch

#copy tftp license <tftp-server-ip> <license-filename> unit <switch-number>

Delete License

#Licence delete unit <switch number>

Verify License

#show license

Ruckus : ICX Add Unit to Existing Stack

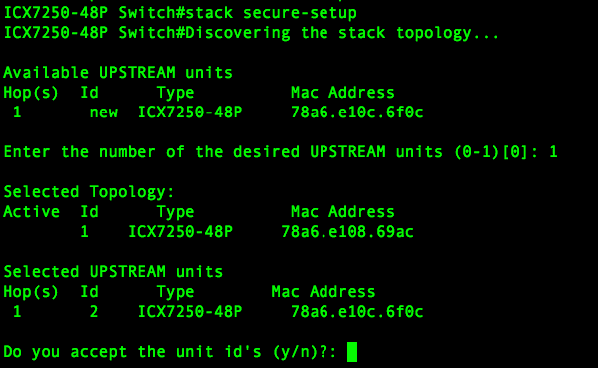
Continuing my theme from last week with the Ruckus ICX Switches. Here is how to add a switch to a stack hot.

Show existing Stack

#Stack secure-setup

Which will discover the new device. Election will run and reboot the newly Stacked Units.

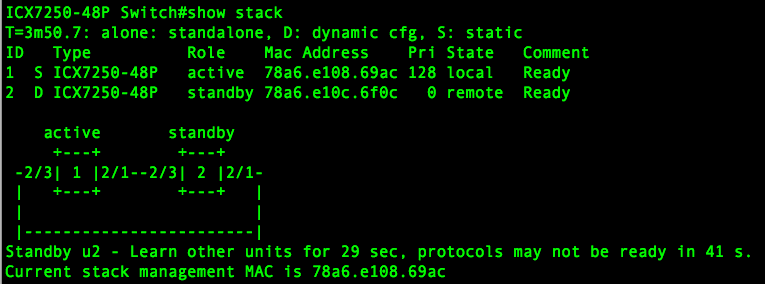
#show stack

‘Wr mem’ on the master switch


Ruckus : ICX Initial Stacking Configuration


Notice: Trying to access array offset on value of type null in /home/minted6/thepacketwizard.com/wp-content/plugins/amazon-associates-link-builder/vendor/mustache/mustache/src/Mustache/Parser.php on line 278

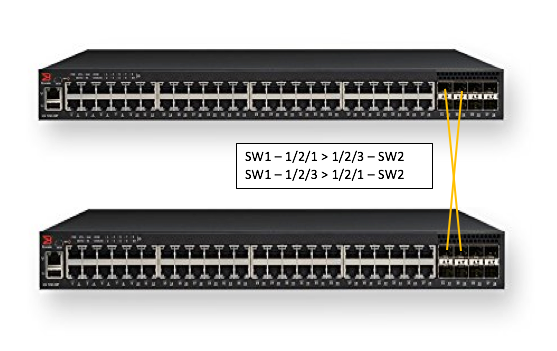
As you may know Brocade ICX switching line was purchased by Ruckus Networks. I have been messing with the Ruckus ICX 7250. Here is the steps to stack them using their Twin-AX cables.

Firstly stacking ICX switches has to be done on 10G Ports, so firstly you have to verify you have the correct license for those ports with the command:

# show license

As you can see from the output there 2 licensed 10G ports and that is the minimum you need to stack.

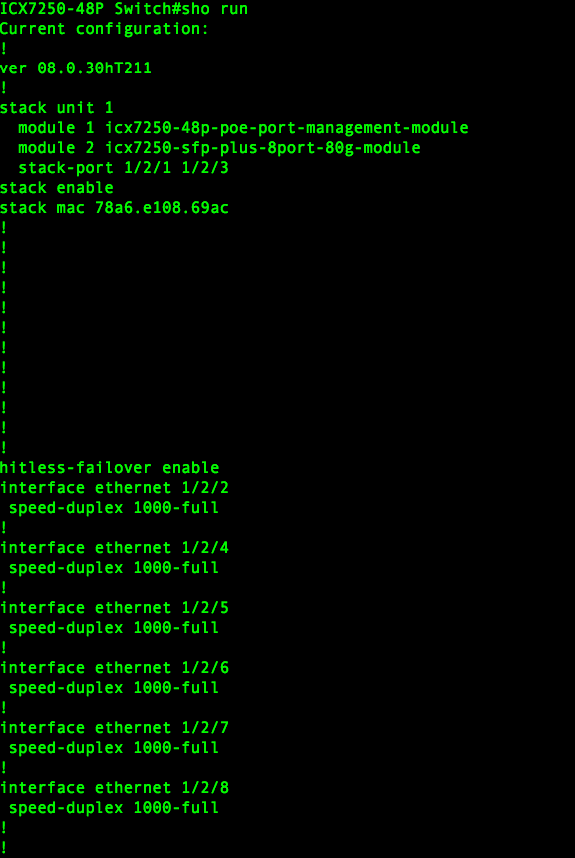
Doing a ‘show run’ confirms that 1/2/1 and 1/2/3 are set to 10G because they DO NOT show up in show run.


Once the 10G ports have been confirmed you can stack them. Here is how.

I have included a link where you can see the cost or purchase these devices:

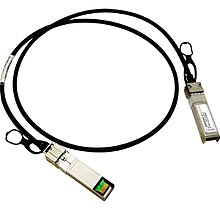
Here is a picture of a Twin-AX Cable

I have included a link where you can see the cost or purchase these devices:

Once the Cables are connected you only have to enable stacking on one switch

Now search for the other devices connected to the stack and confirm you want them part of the election process, then all the non master switches will reboot.

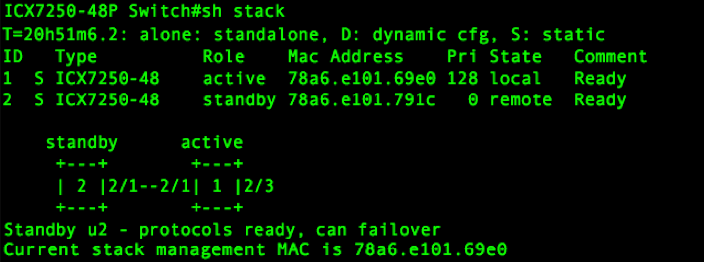
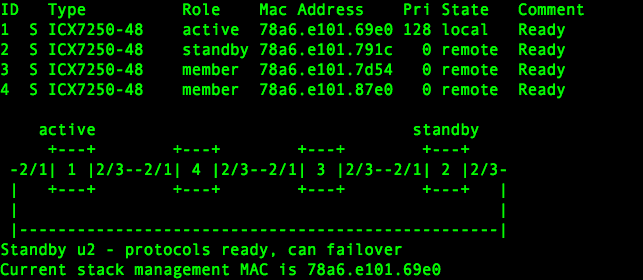
Once the members have rebooted you can verify the stack us up and also shows the connections between the stack ports

Don’t forget to Save

#wr mem


Cisco/Brocade : Basic Similar Commands

  • Here are some basic switch commands and the Cisco to Brocade differences, even though the OS’s are similar they have some subtle differences.

Task

Cisco

Brocade

Configure a VLAN

Interface vlan 2

Vlan 2

Configure a trunk port

Int fa0/1

Switchport trunk encap dot1q

Switchport mode trunk

Vlan 2

Tagged eth 0/1/1

Vlan 3

Tagged eth 0/1/1

Vlan 4

Tagged eth 0/1/1

Interface ethernet 0/1/1

Dual-mode 1

Configure a access port

Int fa0/1

Switchport access vlan 2

Vlan 2

Untagged eth 0/0/1

Configure an IP address on a VLAN

Int vlan2

Ip address 192.168.1.1 255.255.255.0

Vlan 2

Router interface ve 1

Interface ve1

Ip address 192.168.1.1 255.255.255.0

Configure a range of ports

Int range fa0/1-10

Int eth 0/1/1 to 0/1/5

Configure a port for both voice and data vlans

Int fa0/1

Switchport access vlan2

Switchport voice vlan3

vlan2

Tagged eth 0/1/1

vlan3

Tagged eth 0/1/1

Inter eth 0/1/1

Dual-mode 1

Voice-vlan 3

Inline power

Show the interface status of a port/vlan

Sh int fa0/1

Show int eth 0/1/1

See CDP Neighbors

Show cdp neighbors

Show fdp neighbors

Ruckus/Brocade : Configure Spanning Tree 802.1w/RSTP

I want to point out that Ruckus/Brocade has 2 commands that contradict each other when configuring Spanning Tree:

Brocade(config-vlan-1)#spanning-tree  ?

  802-1w          Enable Rapid Spanning Tree IEEE 802.1w
  rstp                  Enable Rapid Spanning Tree

Since RSTP is the same as 802.1w further clarification is needed.

Brocade(config-vlan-1)#spanning-tree rstp  is a Brocade early implementation of the IEEE 802.1W which provided only a subset of the standard, whereas the

Brocade(config-vlan-1)#spanning-tree  802-1w feature provides the full standard, so basically you should use 802.1w.

How to configure Spanning Tree on Brocade

Ran mainly on a per VLAN basis.

Brocade# conf t
Brocade (config)#vlan 1
Brocade (config-vlan-1)#  spanning-tree 802-1w – enabled spanning tree basic mode
Brocade (config-vlan-1)# show 802-1w – shows spanning tree information
Brocade (config-vlan-1)# spanning-tree 802-1w priority 0 – to designate that switch Root bridge

If you know there is a point to point link between 2 rapid spanning tree devices you have to turn that on at the interface level

Point-to-Point/Uplinks
Brocade (config-vlan-1)#int e 1/1/1
Brocade (config-if-e10000-1/1/1)# spanning-tree 802-1w admin-p2pt-mac – don’t allow for a broadcast domain, assume there is a link between 2 rapid spanning tree root bridges/uplinks ( without this it will fail over in 2 seconds or less, but fail back takes the traditional 30 of listening and learning, but this allows it to fail forward and back in 2 seconds or less

Access/Edge-Ports
Brocade (config-if-e10000-1/1/1)# int e 1/1/3 to 1/1/24

Brocade (config-if-e10000-1/1/3-1/1/24)#  spanning-tree 802-1w admin-edge-port (not really required, just means topology changes on the edge is not going to cause re-convergence on the core links or vice versa

Brocade (config-if-e10000-1/1/3-1/1/24)#  show run – will see spanning tree on the VLAN and the int ports

***DO NOT USE VLAN1 IN PRODUCTION, THIS IS PURELY FOR DEMONSTRATION PURPOSES***

Brocade : SSH Setup

Delete Crypto Key

Conf t

Crypto key zeroize

Generate Key Pair

Conf t

Crypto key generate <CR> – will create a DSA Key pair

crypto key generate rsa modulus 2048 – 2048 RSA Key

Create Local Username and Password

Username nocadmin password <password>

Enable AAA

Aaa authentication login default local

Verify

Show who – shows SSH connections