Test Connectivity with Telnet

Telnet is a Network protocol that allows users to connect to and administer a devices Command Line Interface (CLI). However all of the information exchanged on a Telnet session is unencrypted, this means is someone is sniffing the traffic from your host to the device it can be read clearly. So now all know telnet is a super un-secure way to access the CLI of a device, and you should always use SSH where you can, but Telnet can be used in another way. Telnet can only be used to verify network connectivity to remote devices that are TCP based, because TCP is a connection-oriented protocol.

I get requests all the time to open up specific ports on the firewall. You can find a list of the well know port numbers here.

Before I start poking holes in the firewall or other device I check to see if it is already open.

Telnet will by default only check and listen on TCP port 23

If a user asks me is https (port 443) is open to and on a specific server you can easily test with Telnet.

You simply add the port number at the end of the telnet command:

 telnet[host/address[port]]


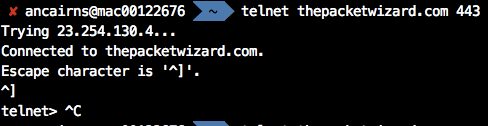
As you can see 443 is open. To exit from the Telnet session: 

SHIFT ]


This telnet test to port 23 is not open as it does not say Connected to…


If a remote host does not respond to telnet it can mean a number of things.

  1. The Firewall or Firewalls or other networking devices on the path to the remote host is Denying or Dropping the packets. You will be able to confirm that in the logs on the firewall.
  2. The server or remote host on the other side is not up and active
  3. There is no connectivity to the remote host for some other reason

Further troubleshooting is required if you encounter issues.

The Packet Wizard : VPN Split-Tunneling

Split-tunneling is a networking approach that lets a remote user using Remote Access Virtual Private Network (RAVPN) to have specific traffic sent to the internet instead of being sent over the encrypted VPN tunnel.

E.g. – A remote user is using a home network, hotel network or coffee shop to Remote Access VPN  (RAVPN) to connect to their works corporate network . The user or VPN subnet with split tunneling enabled can allow the user to send specific traffic such as; access to company file stores, company database servers, company mail servers and other servers on the corporate resources through the RAVPN connection. When the user connects to Internet resources such as Web sites, Personal Webmail, Voice or Video calls, etc.), the connection request can be sent directly out the local gateway provided by the home network, hotel network or coffee shop, thus preventing the traffic from being sent to the corporate network to be redirected to the internet, instead just going directly to the internet.

There are some Advantages of Split-Tunneling can be preventing bottlenecks especially if the user uses Voice/Video calls, where the calls can be severely depredated due to having to pass through the VPN tunnel first.

There are also some disadvantages of Split-Tunneling in that the user now by-passes Corporate security controls  that may be in place by the Security team for access to specific sites etc.

Cisco : Enable SSH on Cisco Switch, Router and ASA

When you configure a Cisco device, you need to use a console cable and connect directly to the system to access it. Follow the SSH setup below, will enable SSH access to your Cisco devices, since SSH is not enabled by default. Once you enable SSH, you can then access it remotely using SecureCRT or any other SSH client.

Set hostname and domain-name

The hostname has to have a hostname and domain-name.

switch# config t
switch(config)# hostname tpw-switch
tpw-switch(config)# ip domain-name thepacketwizard.com

Setup Management IP

In the following example, the management ip address will be set to 10.100.101.2 in the 101 VLAN. The default gateway points to the firewall, which is 10.100.101.1

tpw-switch# ip default-gateway 10.100.101.1
tpw-switch# interface vlan 101
tpw-switch(config-if)# ip address 10.100.101.2 255.255.255.0

Generate the RSA Keys

The switch or router should have RSA keys that it will use during the SSH process. So, generate these using crypto command as shown below.

tpw-switch(config)# crypto key generate rsa
  The name for the keys will be: tpw-switch.thepacketwizard.com
  Choose the size of the key modulus in the range of 360 to 2048 for your
    General Purpose Keys. Choosing a key modulus greater than 512 may take
    a few minutes.

How many bits in the modulus [512]: 1024
  % Generating 1024 bit RSA keys, keys will be non-exportable...[OK]

Setup the Line VTY configurations

Setup the following line vty configuration, where input transport is set to SSH only. Set the login to local, and password to 7, and make sure Telnet is not enabled:

tpw-switch# line vty 0 4
 tpw-switch(config-line)# transport input ssh
 tpw-switch(config-line)# login local
 tpw-switch(config-line)# password 7
 tpw-switch(config-line)# exit

If you have not set the console line yet, use the following:

tpw-switch# line console 0
tpw-switch(config-line)# logging synchronous
tpw-switch(config-line)# login local

Create the username password

If you don’t have an username created already, here is how:

tpw-switch# config t
Enter configuration commands, one per line.  End with CNTL/Z.
tpw-switch(config)# username thepacketwizard password tpwpassword123
tpw-switch# enable secret tpwenablepassword

Make sure the password-encryption service is turned-on, which will encrypt the password, and when you do “show run”, you’ll see only the encrypted password and not clear-text password.

tpw-switch# service password-encryption

Verify SSH access

From the switch, if you do ‘show ip ssh’, it will confirm that the SSH is enabled on this Cisco device.

tpw-switch# show ip ssh
 SSH Enabled - version 1.99
 Authentication timeout: 120 secs; Authentication retries: 3

After the above configurations, login from a remote machine to verify that you can ssh to this cisco switch.

In the example, 10.100.101.2 is the management ip-address of the switch.

TPW-Remote-Computer# ssh 10.100.101.2
 login as: thepacketwizard
 Using keyboard-interactive authentication.
 Password:

tpw-switch>en
 Password:
 tpw-switch#

You are now setup and logged in on SSH!

To read more on SSH visit: https://en.wikipedia.org/wiki/Secure_Shell