Ruckus : Using Multiple RADIUS Servers

I have recently been configuring Network Access Control with 802.1x, and I had been having issues with using multiple RADIUS servers on Ruckus ICX Switches. The main issue being:

RADIUS Authenticate over SSH to switch using Microsoft NPS RADIUS Server
RADIUS Authenticate using 802.1x or MAC-Auth using DOT1x RADIUS Server

In Ruckus ICX switches there isn’t any concept of AAA groups like in Cisco, where you can designate specific RADIUS traffic to go to various different RADIUS Servers.

I have found 2 work arounds, I did however also call support and spend 1 hour troubleshooting with them and they didn’t have an answer for me.

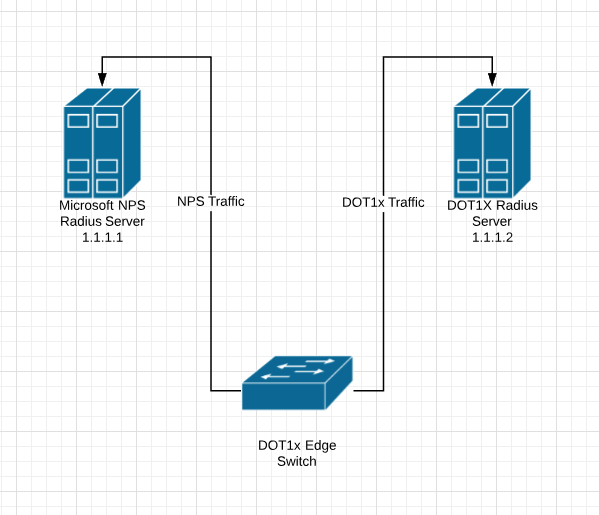
Some Basic Setup Information

Microsoft NPS RADIUS Server : 1.1.1.1
DOT1x RADIUS Server : 1.1.1.2

Here are my AAA Authentication Commands:

SSH@tpw-sw1# sh run | inc authentication
aaa authentication web-server default radius local
aaa authentication enable default radius local
aaa authentication dot1x default radius
aaa authentication login default radius local

Here are my 2 work arounds:

WORKAROUND 1

SSH@tpw-sw1(config)# radius-server host 1.1.1.1 auth-port 1812 acct-port 1813 default key RADIUS1SECRET
SSH@tpw-sw1(config)# radius-server host 1.1.1.2 auth-port 1812 acct-port 1813 default key RADIUS2SECRET dot1x mac-auth

If you use the 1.1.1.2 RADIUS server first in the list you cannot authenticate to the switch at all, even over super-user-password. So the only way I have it working is to have the DOT1x Radius Server listed 2nd but calling out DOT1x and MAC-AUTH.

WORKAROUND 2

The other method I found is to apply a command at the interface level:

SSH@tpw-sw1# conf t
SSH@tpw-sw1(config)# int ethernet 1/1/1
SSH@tandy-lab-sw1(config-if-e1000-1/1/1)#use-radius-server 1.1.1.2

I hope that this helps, I spent a day trying to figure it out 🙂


Test Connectivity with Telnet

Telnet is a Network protocol that allows users to connect to and administer a devices Command Line Interface (CLI). However all of the information exchanged on a Telnet session is unencrypted, this means is someone is sniffing the traffic from your host to the device it can be read clearly. So now all know telnet is a super un-secure way to access the CLI of a device, and you should always use SSH where you can, but Telnet can be used in another way. Telnet can only be used to verify network connectivity to remote devices that are TCP based, because TCP is a connection-oriented protocol.

I get requests all the time to open up specific ports on the firewall. You can find a list of the well know port numbers here.

Before I start poking holes in the firewall or other device I check to see if it is already open.

Telnet will by default only check and listen on TCP port 23

If a user asks me is https (port 443) is open to and on a specific server you can easily test with Telnet.

You simply add the port number at the end of the telnet command:

 telnet[host/address[port]]


As you can see 443 is open. To exit from the Telnet session: 

SHIFT ]


This telnet test to port 23 is not open as it does not say Connected to…


If a remote host does not respond to telnet it can mean a number of things.

  1. The Firewall or Firewalls or other networking devices on the path to the remote host is Denying or Dropping the packets. You will be able to confirm that in the logs on the firewall.
  2. The server or remote host on the other side is not up and active
  3. There is no connectivity to the remote host for some other reason

Further troubleshooting is required if you encounter issues.

Cisco : Enable SSH on Cisco Switch, Router and ASA

When you configure a Cisco device, you need to use a console cable and connect directly to the system to access it. Follow the SSH setup below, will enable SSH access to your Cisco devices, since SSH is not enabled by default. Once you enable SSH, you can then access it remotely using SecureCRT or any other SSH client.

Set hostname and domain-name

The hostname has to have a hostname and domain-name.

switch# config t
switch(config)# hostname tpw-switch
tpw-switch(config)# ip domain-name thepacketwizard.com

Setup Management IP

In the following example, the management ip address will be set to 10.100.101.2 in the 101 VLAN. The default gateway points to the firewall, which is 10.100.101.1

tpw-switch# ip default-gateway 10.100.101.1
tpw-switch# interface vlan 101
tpw-switch(config-if)# ip address 10.100.101.2 255.255.255.0

Generate the RSA Keys

The switch or router should have RSA keys that it will use during the SSH process. So, generate these using crypto command as shown below.

tpw-switch(config)# crypto key generate rsa
  The name for the keys will be: tpw-switch.thepacketwizard.com
  Choose the size of the key modulus in the range of 360 to 2048 for your
    General Purpose Keys. Choosing a key modulus greater than 512 may take
    a few minutes.

How many bits in the modulus [512]: 1024
  % Generating 1024 bit RSA keys, keys will be non-exportable...[OK]

Setup the Line VTY configurations

Setup the following line vty configuration, where input transport is set to SSH only. Set the login to local, and password to 7, and make sure Telnet is not enabled:

tpw-switch# line vty 0 4
 tpw-switch(config-line)# transport input ssh
 tpw-switch(config-line)# login local
 tpw-switch(config-line)# password 7
 tpw-switch(config-line)# exit

If you have not set the console line yet, use the following:

tpw-switch# line console 0
tpw-switch(config-line)# logging synchronous
tpw-switch(config-line)# login local

Create the username password

If you don’t have an username created already, here is how:

tpw-switch# config t
Enter configuration commands, one per line.  End with CNTL/Z.
tpw-switch(config)# username thepacketwizard password tpwpassword123
tpw-switch# enable secret tpwenablepassword

Make sure the password-encryption service is turned-on, which will encrypt the password, and when you do “show run”, you’ll see only the encrypted password and not clear-text password.

tpw-switch# service password-encryption

Verify SSH access

From the switch, if you do ‘show ip ssh’, it will confirm that the SSH is enabled on this Cisco device.

tpw-switch# show ip ssh
 SSH Enabled - version 1.99
 Authentication timeout: 120 secs; Authentication retries: 3

After the above configurations, login from a remote machine to verify that you can ssh to this cisco switch.

In the example, 10.100.101.2 is the management ip-address of the switch.

TPW-Remote-Computer# ssh 10.100.101.2
 login as: thepacketwizard
 Using keyboard-interactive authentication.
 Password:

tpw-switch>en
 Password:
 tpw-switch#

You are now setup and logged in on SSH!

To read more on SSH visit: https://en.wikipedia.org/wiki/Secure_Shell

Network Utilities : SuperPutty Setup

I only use SuperPutty with GNS3, here is how.

  • GNS3 as of 1.5.2 doesn’t include the latest version so download it from here:
  • Start SuperPutty which will present you with the configuration options.  Set the following:
    • YOU MUST USE THE PUTTY PROVIDED WITH GNS3.  If you don’t, you’ll receive errors “unknown option -wt” when opening consoles with SuperPutty from GNS3
    • putty.exe location (Required): C:\Program Files\GNS3\putty.exe
      • Or where-ever GNS3 is installed
    • Click the “Advanced: tab > Check off “Only allow single instance of SuperPutty to run”
  • Set the other options however you like
  • Open up Preferences in GNS3 > General > Console applications tab
  • Change the console application for telnet and serial to use SuperPutty
  • If you want to use keep the same color scheme that is used by the regular Putty console, add “-gns3 5 -skin 4” at the end i.e.
    • c:\dropbox\apps\superputty\SuperPutty.exe -telnet “%h -P %p -wt \”%d\” -gns3 5 -skin 4″

Brocade : SSH Setup

Delete Crypto Key

Conf t

Crypto key zeroize

Generate Key Pair

Conf t

Crypto key generate <CR> – will create a DSA Key pair

crypto key generate rsa modulus 2048 – 2048 RSA Key

Create Local Username and Password

Username nocadmin password <password>

Enable AAA

Aaa authentication login default local

Verify

Show who – shows SSH connections