Cisco Route : PPP

By default Cisco uses HDLC encapsulation on Serial interfaces. We are going to setup a simple PPP link with Authentication.

R1#show int serial 0/0   

Serial0/0 is up, line protocol is up

  Hardware is GT96K Serial

  Internet address is 10.1.1.1/24

  MTU 1500 bytes, BW 1544 Kbit/sec, DLY 20000 usec,

     reliability 255/255, txload 1/255, rxload 1/255

  Encapsulation HDLC, loopback not set

  Keepalive set (10 sec)

  Last input 00:00:09, output 00:00:07, output hang never

  Last clearing of "show interface" counters never

  Input queue: 0/75/0/0 (size/max/drops/flushes); Total output drops: 0

  Queueing strategy: weighted fair
R2#show int serial 0/0

Serial0/0 is up, line protocol is up

  Hardware is GT96K Serial

  Internet address is 10.1.1.2/24

  MTU 1500 bytes, BW 1544 Kbit/sec, DLY 20000 usec,

     reliability 255/255, txload 1/255, rxload 1/255

  Encapsulation HDLC, loopback not set

  Keepalive set (10 sec)

  Last input 00:00:05, output 00:00:06, output hang never

  Last clearing of "show interface" counters never

  Input queue: 0/75/0/0 (size/max/drops/flushes); Total output drops: 0

  Queueing strategy: weighted fair

We have to change that to PPP encapsulation on both sides, other wise there will be a encapsulation mismatch and the Interface will remain up but the line protocol will be down.

R1(config-if)#encapsulation ?

  frame-relay  Frame Relay networks

  hdlc         Serial HDLC synchronous

  lapb         LAPB (X.25 Level 2)

  ppp          Point-to-Point protocol

  smds         Switched Megabit Data Service (SMDS)

  x25          X.25
R1(config-if)#encapsulation ppp
R1(config-if)#

*Mar  1 00:05:27.739: %LINEPROTO-5-UPDOWN: Line protocol on Interface Serial0/0, changed state to down

R1(config-if)#exit                             

R1(config)#exit

R1#sh int serial 0/0

Serial0/0 is up, line protocol is down 

  Hardware is GT96K Serial

  Internet address is 10.1.1.1/24

  MTU 1500 bytes, BW 1544 Kbit/sec, DLY 20000 usec,

     reliability 255/255, txload 1/255, rxload 1/255

  Encapsulation PPP, LCP Listen, loopback not set
R2(config)#int serial 0/0

R2(config-if)#encapsulation ppp

R2(config-if)#exit

R2(config)#exit

R2#sh int serial 0/0

Serial0/0 is up, line protocol is up 

  Hardware is GT96K Serial

  Internet address is 10.1.1.2/24

  MTU 1500 bytes, BW 1544 Kbit/sec, DLY 20000 usec,

     reliability 255/255, txload 1/255, rxload 1/255

  Encapsulation PPP, LCP Open

We should move from HDLC to PPP because PPP has some features that HDLC doesn’t for example, Authentication options, error detection and error recovery features.

Password Authentication Protocol (PAP)  and  Challenge Authentication Protocol (CHAP)

PAP is very passive authentication, where as CHAP actively asks who are you?

PAP also sends username and password in Clear Text.

Here is how to configure CHAP on both routers

The username is the Hostname of the Peer Router you are authenticating to. The passwords must match.

R1(config)#username R2 password TPW

R1(config)#int serial 0/0

R1(config-if)#ppp authentication chap


R2(config)#username R1 password TPW

R2(config)#int serial 0/0

R2(config-if)#ppp authentication chap

Most likely if there is a issue its with the passwords mismatching, but you can always use the command:

R1#debug ppp authentication

Cisco Switch : Private VLAN’s

Private VLAN’s are a very interesting and mostly used for Network segmentation and fun concept but it can take a little to get your head around, so here goes.

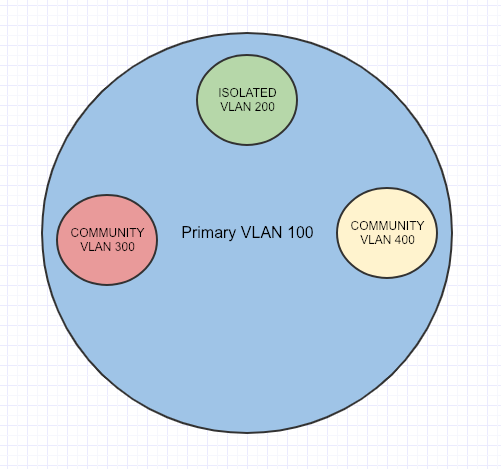
Private VLAN’s split a VLAN into Sub-VLANs, called Primary and Secondary.  Secondary VLAN’s have 2 different types :  Isolated and Community.

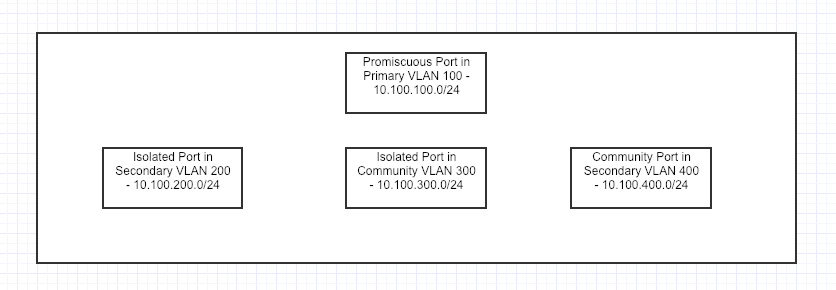
In this example the Primary VLAN is 100 and the Secondary VLAN’s are Isolated VLAN 200, Community VLAN 300 and Community VLAN 400.

An important port to know about before beginning is called the Promiscuous Port. It acts like a Gateway that routes Primary and Secondary-VLAN traffic, and all Secondary-VLAN traffic must pass through the Promiscuous Port.

Isolated ports can only talk to the Primary VLAN through a Promiscuous Port (Uplink/Gateway Port)

Community ports can talk to each other, if they are in the same Community Secondary-VLAN.

VTP must be set to transparent mode for Private VLAN’s to work.

Here is how to configure Private VLAN’s

First we need to configure the Primary VLAN

TPW-SW1(config)#vlan 100
TPW-SW1(config-vlan)#private-vlan primary 
TPW-SW1(config-vlan)#exit

Configure the Isolated VLAN

TPW-SW1(config)#vlan 200
TPW-SW1(config-vlan)#private-vlan isolated 
TPW-SW1(config-vlan)#exit

Configure the Community VLAN’s

TPW-SW1(config)#vlan 300
TPW-SW1(config-vlan)#private-vlan community 
TPW-SW1(config-vlan)#exit

TPW-SW1(config)#vlan 400
TPW-SW1(config-vlan)#private-vlan community 
TPW-SW1(config-vlan)#exit

Now we have to associate the Primary VLAN to the Isolated and Community VLAN’s

TPW-SW1(config)#vlan 100 
TPW-SW1(config-vlan)#private-vlan association 200 
TPW-SW1(config-vlan)#private-vlan association 300
TPW-SW1(config-vlan)#private-vlan association 400

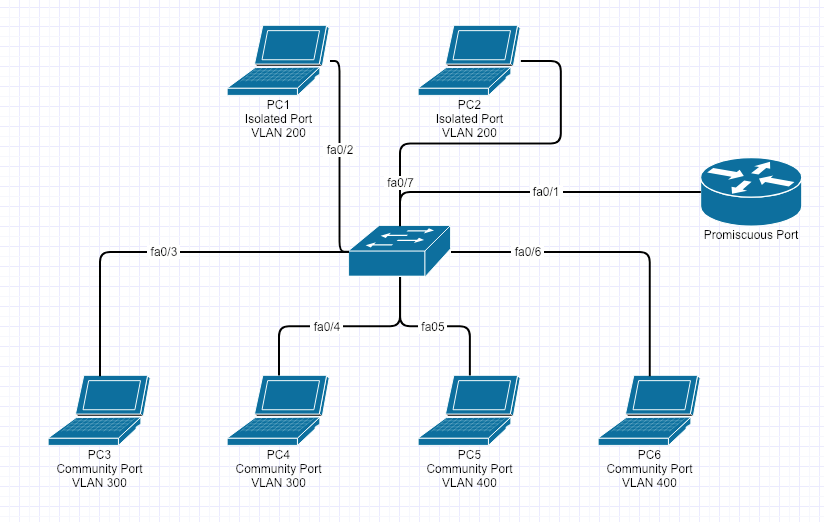
This is where we configure for fa0/1 as the Promiscuous Port

TPW-SW1(config-if)# int fa0/1 
TPW-SW1(config-if)#switchport mode private-vlan promiscuous

We have to tell the Promiscuous Port that it is associated with the  (Isolated and Community VLAN’s) that it can also see and talk to them appropriately.

TPW-SW1(config-if)#switchport private-vlan host-association 100 200,300,400
TPW-SW1(config-if)#exit

Configure fa0/2 and fa0/7 as the Isolated port, but also about its Primary VLAN 100

TPW-SW1(config-if)# int fa0/2 
TPW-SW1(config-if)#switchport mode private-vlan host
TPW-SW1(config-if)#switchport private-vlan host-association 100 200
TPW-SW1(config-if)#exit

TPW-SW1(config-if)# int fa0/7 
TPW-SW1(config-if)#switchport mode private-vlan host 
TPW-SW1(config-if)#switchport private-vlan host-association 100 200 
TPW-SW1(config-if)#exit

Configure fa0/3 and 4 as community ports, but also about its Primary VLAN 100

TPW-SW1(config)#int range fa0/3 - 4 
TPW-SW1(config-if-range)# 
TPW-SW1(config-if-range)# switchport mode private-vlan host
TPW-SW1(config-if-range)# switchport private-vlan host-association 100 300
TPW-SW1(config-if-range)# exit

Configure fa0/5 and 6 as community ports, but also about its Primary VLAN 100

TPW-SW1(config)#int range fa0/5 - 6 
TPW-SW1(config-if-range)# 
TPW-SW1(config-if-range)# switchport mode private-vlan host
TPW-SW1(config-if-range)# switchport private-vlan host-association 100 400
TPW-SW1(config-if-range)# exit

You can confirm the Private VLAN’s are setup correctly with the following show command

TPW-SW1#show vlan private-vlan

Primary      Secondary    Type                Ports
-------      ---------    -----------------   ----------------------------------
100          200          isolated            fa0/2, fa0/7
100          300          community           fa0/3, fa0/4
100          400          community           fa0/5, fa0/6

Here is the topology of what was just built.

Here is a table of what can talk to each other

PC

Computer PC1 – Isolated – VLAN 200 PC2 – Isolated – VLAN 200 PC3 – Community VLAN 300 PC4 – Community VLAN 300 PC5 – Community VLAN 400 PC6 – Community VLAN 400
PC1 – Isolated – VLAN 200 YES NO NO NO NO NO
PC2 – Isolated – VLAN 200 NO YES NO NO NO NO
PC3 – Community VLAN 300 NO NO YES YES NO NO
PC4 – Community VLAN 300 NO NO YES YES NO NO
PC5 – Community VLAN 400 NO NO NO NO YES YES
PC6 – Community VLAN 300 NO NO NO NO YES YES


Cisco Router : RIPng

RIP is a IPv4 Routing Protocol and RIPng is an extension of RIP developed to support IPv6. RIP and RIPng are known as Distance Vector Protocols. They use HOP counts as their metric for determining the best path. Here is some basic information for RIP and RIPng

FEATURE RIP RIPng
Advertised Routes IPv4 IPv6
Transport Protocol UDP 520 UDP 521
Multicast Address 224.0.0.9 FF02::9
VLSM Support Yes Yes
Metric Hop Count (Max 15) Hop Count (Max 15)
Administrative Distance 120 120
Routing Updates Every 30 Seconds and with each topology change Every 30 Seconds and with each topology change
Supports Authentication Yes Yes

RIPng is part of the CCNP Route exam, and even although I have not see it used in production, I have however heard of it being used in UNIX environments. It tends not to be used because it is super chatty, its not very scaleable and is based on the Bellman-Ford algorithms which is prone to routing loops and count to infinity issues.

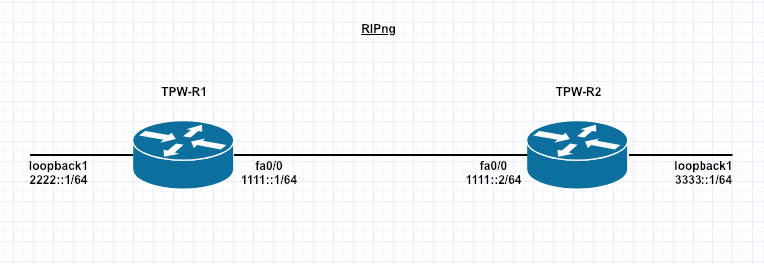
Here is an overview of the basic topology we will be using:

The Steps to configure RIPng:
1. Enable IPv6 Routing
2. Create RIPng Routing Process
3. Enable IPv6 on the interface
4. Enable RIPng on the interface

Here is the configuration steps to enabling RIPng on R1

TPW-R1# conf t
TPW-R1 (config)# ipv6 unicast routing
TPW-R1 (config)# ipv6 router rip TPW_RIP

Complete the steps on R2

TPW-R2# conf t
TPW-R2 (config)# ipv6 unicast routing
TPW-R2 (config)# ipv6 router rip TPW_RIP

You can see the RIPng Routing Protocol is running 

TPW-R1#show ipv6 protocols 
IPv6 Routing Protocol is "connected"
IPv6 Routing Protocol is "static"
IPv6 Routing Protocol is "rip TPW_RIP"
  Interfaces:
    None
TPW-R2#show ipv6 protocols 
IPv6 Routing Protocol is "connected"
IPv6 Routing Protocol is "static"
IPv6 Routing Protocol is "rip TPW_RIP"
  Interfaces:
    None

Although the you can see RIPng is not enabled on any interfaces.

To enable it on the interfaces complete the following commands

TPW-R1#conf t
TPW-R1(config)#int fa0/0
TPW-R1(config-if)#ipv6 rip TPW_RIP enable
TPW-R1(config-if)#int loopback 1        
TPW-R1(config-if)#ipv6 rip TPW_RIP enable

Complete on the 2nd Router

TPW-R2#conf t
TPW-R2(config)#int fa0/0
TPW-R2(config-if)#ipv6 rip TPW_RIP enable
TPW-R2(config-if)#int loopback 1        
TPW-R2(config-if)#ipv6 rip TPW_RIP enable

You can now see the interfaces are running RIPng

TPW-R1#show ipv6 protocols 
IPv6 Routing Protocol is "connected"
IPv6 Routing Protocol is "static"
IPv6 Routing Protocol is "rip TPW_RIP"
  Interfaces:
    Loopback1
    FastEthernet0/0

TPW-R2#show ipv6 protocols 
IPv6 Routing Protocol is "connected"
IPv6 Routing Protocol is "static"
IPv6 Routing Protocol is "rip TPW_RIP"
  Interfaces:
    Loopback1
    FastEthernet0/0

Verify all the routes are in the routing table

TPW-R1#show ipv6 route
IPv6 Routing Table - 7 entries
Codes:
C - Connected, L - Local, S - Static, R - RIP, B - BGP
U - Per-user Static route
I1 - ISIS L1, I2 - ISIS L2, IA - ISIS interarea, IS - ISIS summary
O - OSPF intra, OI - OSPF inter, OE1 - OSPF ext 1,OE2 - OSPF ext 2
ON1 - OSPF NSSA ext 1, ON2 - OSPF NSSA ext 2

C   1111::/64 [0/0]    
via ::, FastEthernet0/0
L   1111::1/128 [0/0]
via ::, FastEthernet0/0
C   2222::/64 [0/0]
     via ::, Loopback1
L   2222::1/128 [0/0]
     via ::, Loopback1
R   3333::/64 [120/2]
     via FE80::C602:52FF:FE37:0, FastEthernet0/0

Verify on the second Router

TPW-R2#show ipv6 route
IPv6 Routing Table - 7 entries

Codes:
C - Connected, L - Local, S - Static, R - RIP, B - BGP
U - Per-user Static route
I1 - ISIS L1, I2 - ISIS L2, IA - ISIS interarea, IS - ISIS summary
O - OSPF intra, OI - OSPF inter, OE1 - OSPF ext 1, OE2 - OSPF ext 2
ON1 - OSPF NSSA ext 1, ON2 - OSPF NSSA ext 2

C   1111::/64 [0/0]
     via ::, FastEthernet0/0
L   1111::2/128 [0/0]
     via ::, FastEthernet0/0
R   2222::/64 [120/2]
     via FE80::C601:52FF:FE34:0, FastEthernet0/0
C   3333::/64 [0/0]
     via ::, Loopback1
L   3333::1/128 [0/0]
     via ::, Loopback1

We need to verify connectivity TPW-R1

TPW-R1#ping ipv6 1111::1
Type escape sequence to abort.
Sending 5, 100-byte ICMP Echos to 1111::1, timeout is 2 seconds:
!!!!!
Success rate is 100 percent (5/5), round-trip min/avg/max = 0/0/4 ms

TPW-R1#ping ipv6 1111::2
Type escape sequence to abort.
Sending 5, 100-byte ICMP Echos to 1111::2, timeout is 2 seconds:
!!!!!
Success rate is 100 percent (5/5), round-trip min/avg/max = 28/28/28 ms

TPW-R1#ping ipv6 2222::1
Type escape sequence to abort.
Sending 5, 100-byte ICMP Echos to 2222::1, timeout is 2 seconds:
!!!!!
Success rate is 100 percent (5/5), round-trip min/avg/max = 0/2/4 ms

TPW-R1#ping ipv6 3333::1
Type escape sequence to abort.
Sending 5, 100-byte ICMP Echos to 3333::1, timeout is 2 seconds:
!!!!!

Finally, We need to verify connectivity TPW-R2

TPW-R2#ping ipv6 1111::1
Type escape sequence to abort.
Sending 5, 100-byte ICMP Echos to 1111::1, timeout is 2 seconds:
!!!!!
Success rate is 100 percent (5/5), round-trip min/avg/max = 0/0/4 ms

TPW-R2#ping ipv6 1111::2
Type escape sequence to abort.
Sending 5, 100-byte ICMP Echos to 1111::2, timeout is 2 seconds:
!!!!!
Success rate is 100 percent (5/5), round-trip min/avg/max = 28/28/28 ms

TPW-R2#ping ipv6 2222::1
Type escape sequence to abort.
Sending 5, 100-byte ICMP Echos to 2222::1, timeout is 2 seconds:
!!!!!
Success rate is 100 percent (5/5), round-trip min/avg/max = 0/2/4 ms

TPW-R2#ping ipv6 3333::1
Type escape sequence to abort.
Sending 5, 100-byte ICMP Echos to 3333::1, timeout is 2 seconds:
!!!!!
Success rate is 100 percent (5/5), round-trip min/avg/max = 8/23/28 ms

RIPng is fully configured and working.

Note that using FE80::1 link-local and FE80:2 link-local – for point to point its a lot easier to ping – unique link local on every router and interface, I just wanted to make it a bit easier to see by using 1111::1 and 2, 2222 and 3333

Cisco Switch : Dynamic ARP Inspection

Dynamic ARP inspection, starts with a man in the middle attack, with the rogue user and PC sending a gratuitous ARP to say the MAC address for your default gateway is this, then the user accessing anything using the default gateway is sending all its traffic to the rogue users pc, which is then copying all the packets before sending it on to its destination.


DHCP snooping must be enabled, for DAI to be enabled.


Here is how to configure DAI:

tpw-sw1(conf)# ip arp inspection vlan 10
tpw-sw1(conf)# int gi0/1
tpw-sw1(config-int)#ip arp inspection trust


How to Check and Verify DAI:

tpw-sw1# show ip arp inspection

Cisco Switch : Storm Control

Storm Control can shut down an interface that is causing a Unicast, Multicast or Broadcast Storm. It works with Rising and Falling Thresholds. If a specific type of traffic hits the rising Threshold it will block that type of traffic until the number of packets it see’s is below the set falling threshold. This can be in Percentage, Bits Per Second or Packets Per Second

Here is how to enable its various options:

tpw-sw1(conf)# int gi0/1
tpw-sw1(config-int)# storm-control broadcast level 10 5 - this command means if I see more than 10% broadcast traffic I will block until I see it fall under 5%
tpw-sw1(conf)# int gi0/1
tpw-sw1(config-int)# storm-control multicast level bps 20m 10m - this command means if I see more than 20Mbps multicast traffic I will block until I see it fall under 10Mbps
tpw-sw1(conf)# int gi0/1
tpw-sw1(config-int)# storm-control unicast level pps 50k  - this command means if I see more than 50,000 unicast packets per second, I will drop traffic until I see it fall below 50,000 packers per second, that is what happens if you do not put a falling threshold. Both rising and falling threshold is 50,000
tpw-sw1(conf)# int gi0/1
tpw-sw1(config-int)# storm-control action shutdown

Check and Verify

tpw-sw1(conf)# show storm-control broadcast

tpw-sw1(conf)# show storm-control multicast

tpw-sw1(conf)# show storm-control unicast

Cisco Switch : VLAN ACL’s (VACL)

This week, I have been studying and configuring VLAN ACL’s. VLAN ACL’s have a use because Regular ACL’s can be used to filter inter-VLAN traffic but not intra-VLAN traffic. Filtering between hosts on the same VLAN require the use of VLAN Access Lists (VACL).

The VACL will do the actual filtering of the traffic, but we still need to write an ACL to identify the traffic. The ACL will be used as a match criteria within the VACL to drop of forward the traffic.

I will show you how to implement a VACL on TPWSW1 that will prevent anyone from telnetting from UserPC1 subnet while allowing all other traffic.

The process  I always follow for doing this is:
1. Build ACL
2. Build VACL
3. Apply VACL to VLAN

Build ACL

I always start a VACL with a regular extended ACL. Try and use descriptive names so when you look at it in 6 month it will mean something.

Create an extended access list named no_telnet_access_list and add an ACL statement that permits Telnet traffic:

TPWSW1(config)#ip access-list extended no_telnet_access_list 
TPWSW1(config-ext-nacl)#permit tcp any any eq telnet

Create an access list named allow_all_traffic and to add an ACL statement that permits all IP traffic:

TPWSW1(config)#ip access-list extended all_traffic
TPWSW1(config-ext-nacl)#permit ip any any

Verify the no_telnet_access_list and the allow_all_traffic access lists you created.

TPWSW1#show access-lists
Extended IP access list allow_all_traffic    
10 permit ip any any
Extended IP access list no_telnet_access_list   
10 permit tcp any any eq telnet

Write the VACL

Create a VLAN access map named vlan_access_map with a sequence number of 10:

TPWSW1(config)#vlan access-map vlan_access_map 10

Configure TPWSW1. Create a match statement that will match an access list named no_telnet_access_list:

TPWSW1(config-access-map)#match ip address no_telnet_access_list

On TPWSW1, Configure an action for the VLAN access map that will drop the packets matched by the no_telnet_access_list access list:

TPWSW1(config-access-map)#action drop

Create a match statement that matches the allow_all_traffic access list and uses sequence number 20:

TPWSW1(config)#vlan access-map vlan_access_map 20
TPWSW1(config-access-map)#match ip address allow_all_traffic

Configure an action for the VLAN access map that will forward the traffic matched by the allow_all_traffic access list:

TPWSW1(config-access-map)#action forward

Verify the access map configuration.

TPWSW1#show vlan access-map
       Vlan access-map “vlan_map”  10  
       Match clauses: IP address: no_telnet_access_list
           Action:
             drop

       Vlan access-map “vlan_map”  20  
       Match clauses:IP address: all_traffic
           Action:
             forward

Apply VACL to VLAN

Apply the vlan_access_map access map to VLAN 5:

TPWSW1(config)#vlan filter vlan_access_map vlan-list 5

Verify the application of the access map to the VLAN.

TPWSW1#show vlan filter
    VLAN Map vlan_map is filtering VLANs:
      5

Verify you cannot access the switch using Telnet. Now obviously you could turn off Telnet other ways, this was purely to demonstrate how powerful these VACL’s can be.

Cisco : Port Security

Is this frame from a trusted Source? That is the question!

As I continue my CCNP studies, I near the end of the CCNP Switch Course, this is a topic that was covered in the CCNA, and I haven’t really touched it since, so here is a refresher.

A port enabled with port security will expect to see frames sourced from a particular MAC address or group of MAC addresses, if the switch receives a frame from a MAC address it does not have listed the port takes action according to the violation mode that is set. The violation mode by default is to shutdown the port.

Enable Port Security

*You can only enable port security on a edge port, so that means that port can never become a trunk port*

tpw-sw1(conf)# int gi0/1
tpw-sw1(config-int)#switchport mode access
tpw-sw1(config-int)#switchport access vlan 10
tpw-sw1(config-int)#switchport port-security

Confirm it is working and information gathering

tpw-sw1# show port-security
tpw-sw1# show port-security address
tpw-sw1# show port-security interface gi0/1

More Port Security options

tpw-sw1(conf)# int gi0/1
tpw-sw1(config-int) switchport port-security ?
          aging - Port-security aging commands
          mac-address  - Secure mac address
          maximum - Max secure addresses
          violation - Security violation mode
tpw-sw1(config-int) switchport port-security maximum <1-6144>
tpw-sw1(config-int) switchport port-security violation ?
          protect - Security violation protect mode (drops the offending frames )
          restrict - Security violation restrict mode (drops, creates log messages, but port remains active )
          shutdown - Security violation shutdown mode (default will put the port into err-disabled (fix problem first and shut, no shut))
tpw-sw1(config-int) switchport port-security mac-address ?
         H.H.H - 48 bit mac address
         sticky - Configure dynamic secure addresses as sticky (dynamic addresses but kept on switch reload )
tpw-sw1(config-int) switchport port-security aging ?
         time Port-security aging time
         type Port-security aging type

This is just the very basics of Port Security, there is similar implementations on all switches I have worked with.

The Packet Wizard : Today I begin the CCNP R&S


Notice: Trying to access array offset on value of type null in /home/minted6/thepacketwizard.com/wp-content/plugins/amazon-associates-link-builder/vendor/mustache/mustache/src/Mustache/Parser.php on line 278

Today, I officially start the CCNP Route Switch Course.

I have purchased the following book set, I have provided a link if you wish to purchase them:

I am also using Chris Bryant’s Video Udemy Course (Who helped me pass the CCNA R&S and Security, very thorough video series) and I will try and get his books. I have provided a link if you wish to purchase them :

https://www.udemy.com/ccnpallinone/

I plan to have passed the CCNP Switch by July, because I have some pretty big work trips coming up and I know that is going to get in the way a little. However the 18hr flight to Singapore, I should be able to get through a power of reading and labs 🙂

I will start to blog on my progress and things I am learning.

Wish me Luck!