Cisco : Port Security

Is this frame from a trusted Source? That is the question!

As I continue my CCNP studies, I near the end of the CCNP Switch Course, this is a topic that was covered in the CCNA, and I haven’t really touched it since, so here is a refresher.

A port enabled with port security will expect to see frames sourced from a particular MAC address or group of MAC addresses, if the switch receives a frame from a MAC address it does not have listed the port takes action according to the violation mode that is set. The violation mode by default is to shutdown the port.

Enable Port Security

*You can only enable port security on a edge port, so that means that port can never become a trunk port*

tpw-sw1(conf)# int gi0/1
tpw-sw1(config-int)#switchport mode access
tpw-sw1(config-int)#switchport access vlan 10
tpw-sw1(config-int)#switchport port-security

Confirm it is working and information gathering

tpw-sw1# show port-security
tpw-sw1# show port-security address
tpw-sw1# show port-security interface gi0/1

More Port Security options

tpw-sw1(conf)# int gi0/1
tpw-sw1(config-int) switchport port-security ?
          aging - Port-security aging commands
          mac-address  - Secure mac address
          maximum - Max secure addresses
          violation - Security violation mode
tpw-sw1(config-int) switchport port-security maximum <1-6144>
tpw-sw1(config-int) switchport port-security violation ?
          protect - Security violation protect mode (drops the offending frames )
          restrict - Security violation restrict mode (drops, creates log messages, but port remains active )
          shutdown - Security violation shutdown mode (default will put the port into err-disabled (fix problem first and shut, no shut))
tpw-sw1(config-int) switchport port-security mac-address ?
         H.H.H - 48 bit mac address
         sticky - Configure dynamic secure addresses as sticky (dynamic addresses but kept on switch reload )
tpw-sw1(config-int) switchport port-security aging ?
         time Port-security aging time
         type Port-security aging type

This is just the very basics of Port Security, there is similar implementations on all switches I have worked with.

Arista : VARP Configuration

Virtual-ARP or VARP is a routing technique that allows multiple switches or routers to simultaneously route packets from a common Virtual IP (VIP) address in an active/active switch/router configuration. Each switch or router is configured with the same VIP address on the corresponding VLAN interfaces (SVI) and a common virtual MAC address. In MLAG topologies, VARP is preferred over VRRP because VARP does not require traffic to traverse the peer-link to the master router as VRRP would.

A maximum of 500 VIP addresses can be assigned to a single VLAN interface. All virtual addresses on all VLAN interfaces resolve to the same virtual MAC address. However you cannot have a secondary VIP on the same VLAN interface, you can however implement VRRP on the same VLAN interface as VARP.

VARP functions by having each switch respond to ARP and GARP requests for the configured router IP address with the virtual MAC address. The virtual MAC address is only for inbound packets and never used in the source field of outbound packets.

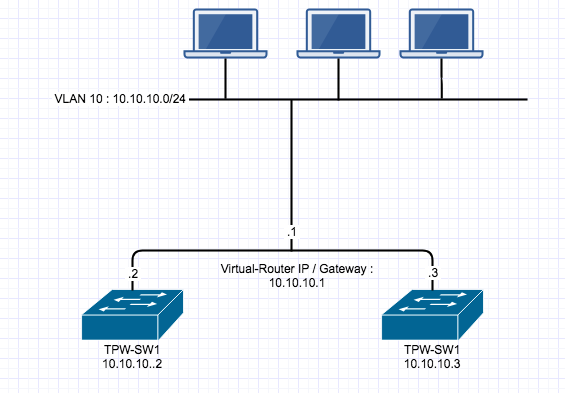
The following commands configures 10.10.10.1 as the virtual IP address for VLAN 10. The Virtual-Router MAC address is entirely invented by you, I had a real issue finding clarification that it was just a made up MAC address, so here is my invented made up Virtual-Router MAC 1010.1010.1010 as the virtual MAC address on both switches. I also ran into an issue where #ip routing had to be enabled.

Here is what the Topology would look like:

Configuration that implements VARP on the first switch

TPW-SW1(config)#ip virtual-router mac-address 1010.1010.1010

TPW-SW1(config)#interface vlan 10

TPW-SW1(config-if-vl10)#ip address 10.10.10.2/24

TPW-SW1(config-if-vl10)#ip virtual-router address 10.10.10.1

Configuration that implements VARP on the second switch

TPW-SW2(config)#ip virtual-router mac-address 1010.1010.1010

TPW-SW2(config)#interface vlan 10

TPW-SW2(config-if-vl10)#ip address 10.10.10.3/24

TPW-SW2(config-if-vl10)#ip virtual-router address 10.10.10.1


Arista : MLAG Setup


Notice: Trying to access array offset on value of type null in /home/minted6/thepacketwizard.com/wp-content/plugins/amazon-associates-link-builder/vendor/mustache/mustache/src/Mustache/Parser.php on line 278

I have recently been setting up some Arista switches for a network refresh at our Boston site.

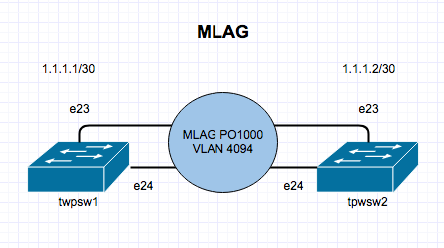
MLAG is short for Multi Chassis Link Aggregation and it allows more than 1 switch usually 2, to act like one logical switch which can allow you to just manage one switch instead of multiple. It also helps with redundancy and diversify paths. Its an awesome technology.  Here is the basic MLAG Topology:

1. Create Port Channel For Peer Links

I am using 2 Arista DCS-7150S-24-R switches with 2 10Gb Ethernet as our MLAG peer links. On each switch we will create a port channel 1000

 tpwsw1# config t
 tpwsw1(conf)#interface e23-24
 tpwsw1(config-if-Et23-24)# channel-group 1000 mode active
 tpwsw1(config-if-Et23-24)# interface port-channel 1000
 tpwsw1(config-if-Po1000)# switchport mode trunk


2. Create a VLAN for Peer MLAG Communication

You need to create a separate VLAN for MLAG communication and assign it the mlag-peer trunk group and disable spanning-tree on the VLAN. This step is done on both switches.

 tpwsw1(conf)#vlan 4094
 tpwsw1(config-vlan-4094)# trunk group mlag-peer
 tpwsw1(config-vlan-4094)# interface port-channel 1000
 tpwsw1(config-if-Po1000)# switchport trunk group mlag-peer
 tpwsw1(config-if-Po1000)# exit
 tpwsw1(conf)#no spanning-tree vlan 4094


 tpwsw2(conf)#vlan 4094
 tpwsw2(config-vlan-4094)# trunk group mlag-peer
 tpwsw2(config-vlan-4094)# interface port-channel 1000
 tpwsw2(config-if-Po1000)# switchport trunk group mlag-peer
 tpwsw2(config-if-Po1000)# exit
 tpwsw2(conf)#no spanning-tree vlan 4094


3. Set an IP on each Switch
On VLAN 4094 that was created above, we need to assign it an IP so each switch can communicate over layer 3 with each other.


tpwsw1(conf)#int vlan 4094
tpwsw1(config-if-Vl4094)# ip address 1.1.1.1/30


tpwsw2(conf)#int vlan 4094
tpwsw2(config-if-Vl4094)# ip address 1.1.1.2/30

***Send some pings to confirm basic connectivity


4. Configure MLAG peering for each switch

 tpwsw1(config)#mlag
 tpwsw1(config-mlag)#local-interface vlan 4094
 tpwsw1(config-mlag)#peer-address 1.1.1.2
 tpwsw1(config-mlag)#peer-link port-channel 1000
 tpwsw1(config-mlag)#domain-id mlagDOMAIN


 tpwsw2(config)#mlag
 tpwsw2(config-mlag)#local-interface vlan 4094
 tpwsw2(config-mlag)#peer-address 1.1.1.1
 tpwsw2(config-mlag)#peer-link port-channel 1000
 tpwsw2(config-mlag)#domain-id mlagDOMAIN


5. Verify MLAG Domain
On each switch, do a #show mlag to see if MLAG is up and running and you can confirm this by seeing State:Active and peer-link status: UP and locl-int status:UP

tpwsw1(config-mlag)#show mlag
MLAG Configuration:
domain-id : mlagDOMAIN
local-interface : Vlan4094
peer-address : 1.1.1.2
peer-link : Port-Channel1000
MLAG Status:
state : Active
negotiation status : Connected
peer-link status : Up
local-int status : Up
system-id : 02:1c:73:1e:97:dc
MLAG Ports:
Disabled : 0
Configured : 0
Inactive : 0
Active-partial : 0
Active-full : 0


tpwsw2(config-mlag)#show mlag
MLAG Configuration:
domain-id : mlagDOMAIN
local-interface : Vlan4094
peer-address : 1.1.1.1
peer-link : Port-Channel1000
MLAG Status:
state : Active
negotiation status : Connected
peer-link status : Up
local-int status : Up
system-id : 02:1c:73:1e:97:dc
MLAG Ports:
Disabled : 0
Configured : 0
Inactive : 0
Active-partial : 0
Active-full : 0


You can read more about MLAG here – https://www.arista.com/en/products/multi-chassis-link-aggregation-mlag

A great book to read about Arista is called Arista Warrior. I loved it. You can buy it here:

Ruckus : L3 Routing Image on Switch

There are 2 different versions of code for the ICX switches depending on what you are doing with them. Layer 3 or Layer 2. If you are going to be doing L3, you will need a license for that.

Software on the device is listed within:


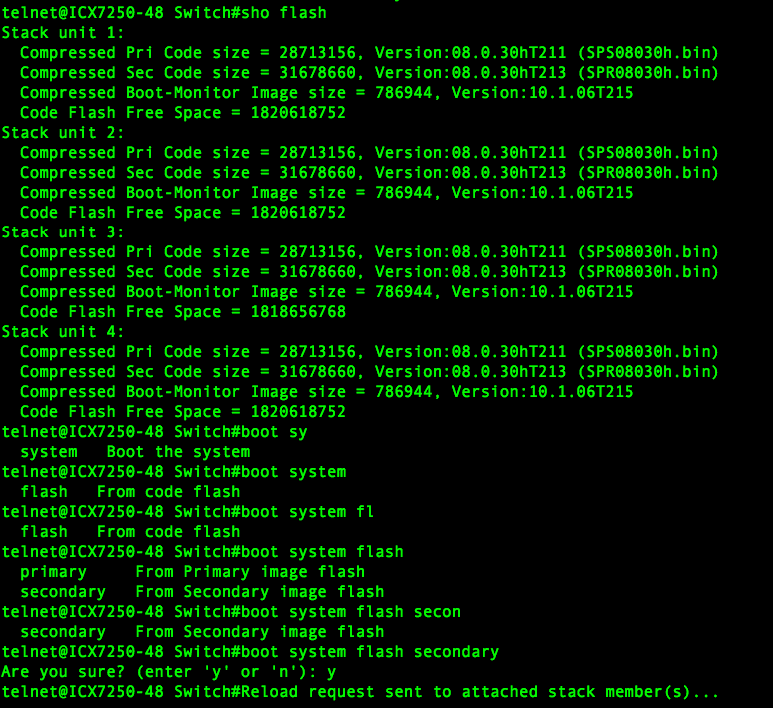
 #show flash


SPS – S is for Switching

SPR – R is for Routing

Ruckus Recommend if you are using L3 then to boot the system to SPR.

Once it has rebooted do not forget to make sure you set it to boot from the Router image if the switch was to reboot for any reason. (make sure you are in configure terminal mode or you will cause a reboot)

Avoid this!!!

This is correct in (config) mode

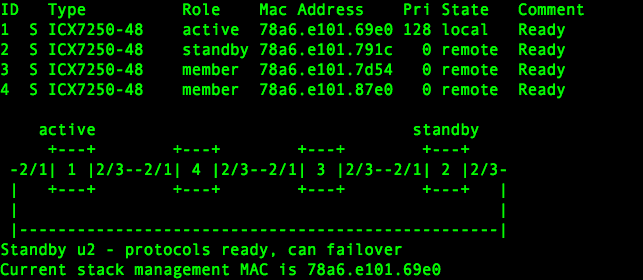
Ruckus : ICX Add Unit to Existing Stack

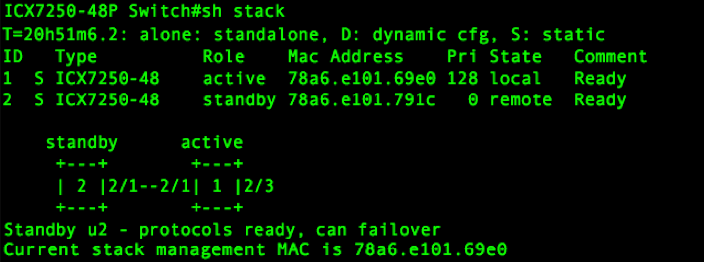
Continuing my theme from last week with the Ruckus ICX Switches. Here is how to add a switch to a stack hot.

Show existing Stack

#Stack secure-setup

Which will discover the new device. Election will run and reboot the newly Stacked Units.

#show stack

‘Wr mem’ on the master switch


Cisco : Enable SSH on Cisco Switch, Router and ASA

When you configure a Cisco device, you need to use a console cable and connect directly to the system to access it. Follow the SSH setup below, will enable SSH access to your Cisco devices, since SSH is not enabled by default. Once you enable SSH, you can then access it remotely using SecureCRT or any other SSH client.

Set hostname and domain-name

The hostname has to have a hostname and domain-name.

switch# config t
switch(config)# hostname tpw-switch
tpw-switch(config)# ip domain-name thepacketwizard.com

Setup Management IP

In the following example, the management ip address will be set to 10.100.101.2 in the 101 VLAN. The default gateway points to the firewall, which is 10.100.101.1

tpw-switch# ip default-gateway 10.100.101.1
tpw-switch# interface vlan 101
tpw-switch(config-if)# ip address 10.100.101.2 255.255.255.0

Generate the RSA Keys

The switch or router should have RSA keys that it will use during the SSH process. So, generate these using crypto command as shown below.

tpw-switch(config)# crypto key generate rsa
  The name for the keys will be: tpw-switch.thepacketwizard.com
  Choose the size of the key modulus in the range of 360 to 2048 for your
    General Purpose Keys. Choosing a key modulus greater than 512 may take
    a few minutes.

How many bits in the modulus [512]: 1024
  % Generating 1024 bit RSA keys, keys will be non-exportable...[OK]

Setup the Line VTY configurations

Setup the following line vty configuration, where input transport is set to SSH only. Set the login to local, and password to 7, and make sure Telnet is not enabled:

tpw-switch# line vty 0 4
 tpw-switch(config-line)# transport input ssh
 tpw-switch(config-line)# login local
 tpw-switch(config-line)# password 7
 tpw-switch(config-line)# exit

If you have not set the console line yet, use the following:

tpw-switch# line console 0
tpw-switch(config-line)# logging synchronous
tpw-switch(config-line)# login local

Create the username password

If you don’t have an username created already, here is how:

tpw-switch# config t
Enter configuration commands, one per line.  End with CNTL/Z.
tpw-switch(config)# username thepacketwizard password tpwpassword123
tpw-switch# enable secret tpwenablepassword

Make sure the password-encryption service is turned-on, which will encrypt the password, and when you do “show run”, you’ll see only the encrypted password and not clear-text password.

tpw-switch# service password-encryption

Verify SSH access

From the switch, if you do ‘show ip ssh’, it will confirm that the SSH is enabled on this Cisco device.

tpw-switch# show ip ssh
 SSH Enabled - version 1.99
 Authentication timeout: 120 secs; Authentication retries: 3

After the above configurations, login from a remote machine to verify that you can ssh to this cisco switch.

In the example, 10.100.101.2 is the management ip-address of the switch.

TPW-Remote-Computer# ssh 10.100.101.2
 login as: thepacketwizard
 Using keyboard-interactive authentication.
 Password:

tpw-switch>en
 Password:
 tpw-switch#

You are now setup and logged in on SSH!

To read more on SSH visit: https://en.wikipedia.org/wiki/Secure_Shell

Palo Alto : Upgrade High Availability (HA) Pair

Over the last 3 weeks since the Christmas and New Year Holidays,  I have been upgrading all of our firewalls globally, many of them are an High Availability Pair. This means they are redundant and being redundant allows me to upgrade them individually while the site stays full up and functional.
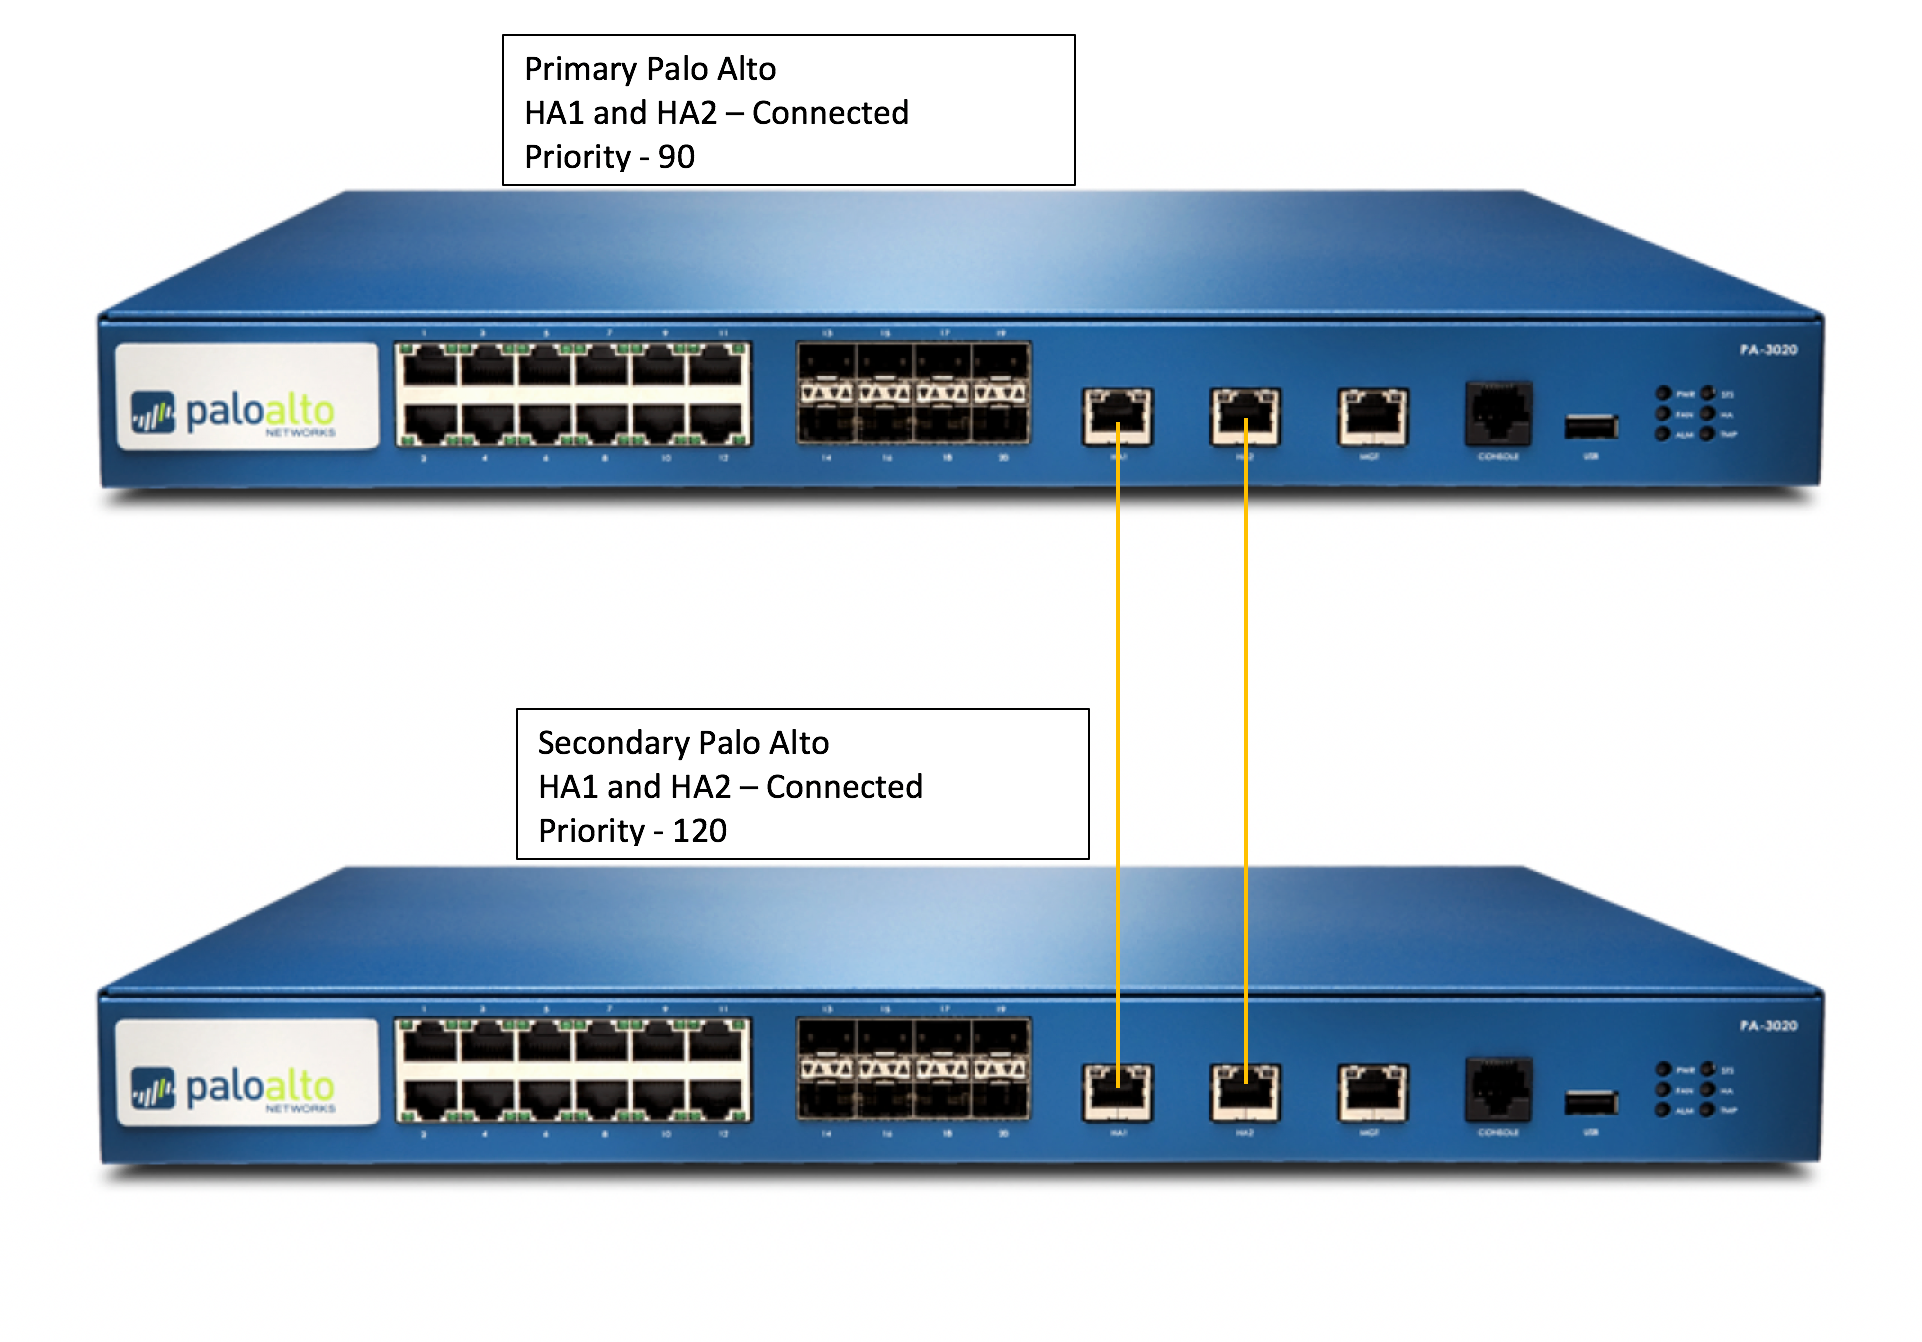
The  instructions for upgrading an HA pair are recommended because:

      • It verifies HA functionality before starting the upgrade.
      • It ensures the upgrade is successfully applied to the first device before starting the upgrade on the second.
      • At any point in the procedure, if any issue arises, the upgrade can be seamlessly reverted without any expected downtime (unless you are having any dynamic routing protocols line OSPF/BGP).
      • When finished, the final active/passive device state will be the same as it was before the upgrade with the fewest number of fail overs possible (2).

Before you Begin :

Take backup of the configuration as well as Tech Support from both HA Peers. Give proper names to each file, here is how:

Device > Setup > Operations > Save Named Configuration Snapshot

Device > Setup > Operations > Export Named configuration Snapshot

Device > Setup > Operations > Export Device State (If device managed from panorama

Device > Support > Generate Tech Support File, and then download it. (Might be required if any issues)

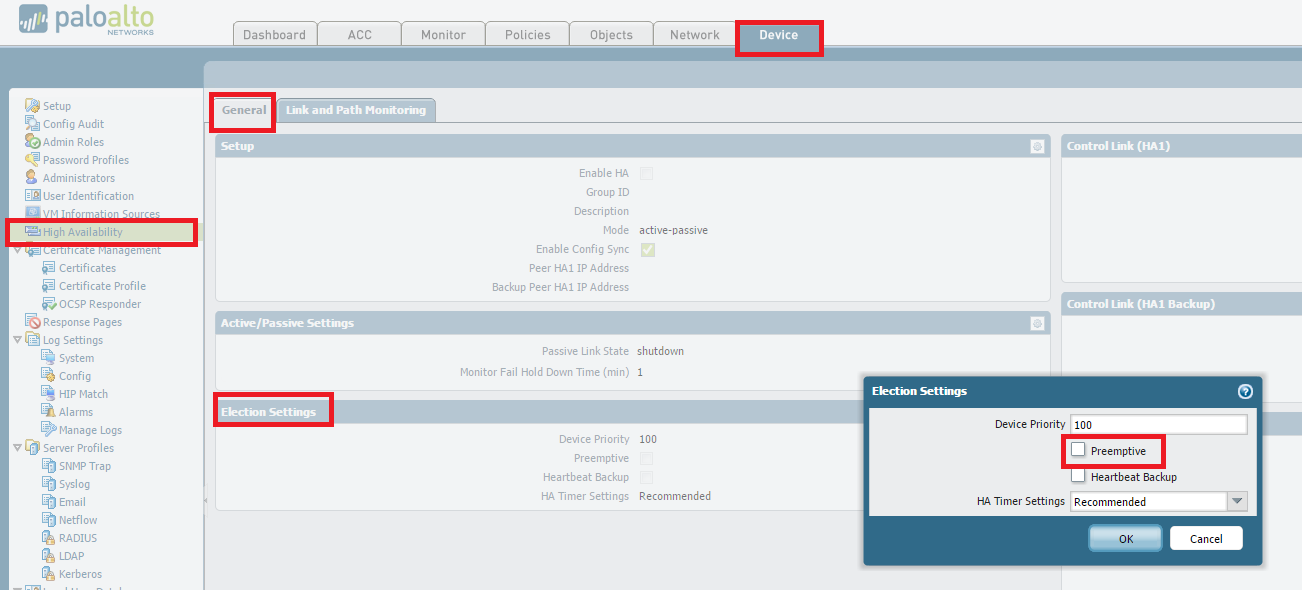
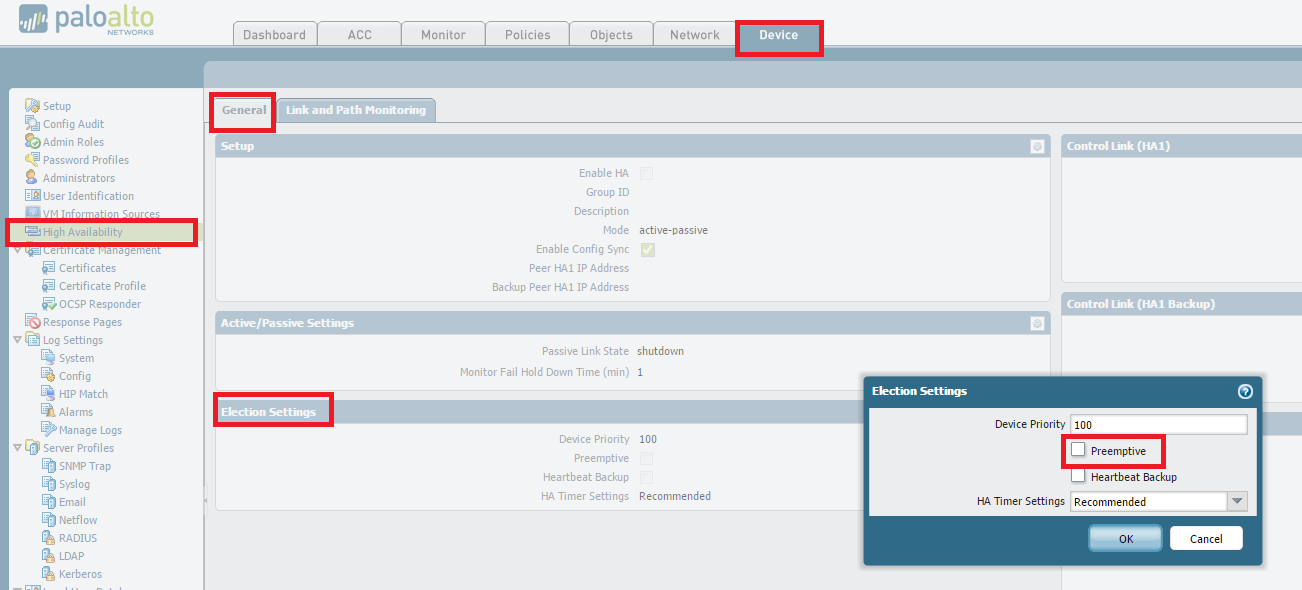
(Optional but recommended) Disable preemption on High Availability settings to avoid the possibility of unwanted failovers. Disabling preempt configuration change must be committed on both peers. Likewise, once completed, re-enabling must be committed on both peers.

To disable preempt, go to

Device > High Availability > Election Settings and uncheck Preemptive.
Then, perform a commit.


If upgrade is between major versions (4.1 -> 5.0 OR 5.0-> 6.0), it is advisable to disable TCP-Reject-Non-SYN, so that sessions can failover even when they are not in sync. : Do this on both Firewalls from the CLI:

 # set deviceconfig setting session tcp-reject-non-syn no
 # commit


(Optional but recommended) Arrange for Out-of-Band access (Console access) to the firewall if possible. This is again to help recover from any unexpected situation where we are unable to login to the firewall. If you have a Terminal Server awesome, if not a simple Cell Phone tethered to a Laptop with RDP is also fine.


The Upgrade Process

Suspend Backup Device 

From the CLI

 > request high-availability state suspend

From the GUI

Go to Device > High Availability > Operational Commands  > Suspend local device

Install the new PAN-OS on the suspended device

Device > Software > Install

Reboot the device to complete the install.

When the upgraded device is rebooted, check the dashboard to check the version, wait for all the interfaces to come backup green.

If the device is still in suspended state make it functional again

From the CLI

> request high-availability state functional

From the GUI

Go to Device > High Availability > Operational Commands  > Make Local Device Functional


Repeat steps on other firewall.


Suspend Primary Device

From CLI

> request high-availability state suspend

From the GUI

Go to Device > High Availability > Operational Commands  > Suspend local device.


*The Backup Firewall will become Active – it does take 30-45 seconds so don’t panic


Install the new PAN-OS on the suspended device:

Device > Software > Install

Reboot the device to complete the install.

When the upgraded device is rebooted, check the dashboard to check the version, wait for all the interfaces to come backup green.

If the device is still in suspended state make it functional again

From the CLI

> request high-availability state functional

From the GUI

Go to Device > High Availability > Operational Commands  > Make Local Device Functional

To Get Primary Back to Primary by suspending the backup (current active) firewall (The Original Backup Firewall)

From the GUI,

Go to Device > High Availability > Operational Commands  > Suspend local device.

Once the Primary became active again, enable the suspended backup firewall

Enable TCP-Reject-Non-SYN, so that sessions can failover even when they are not in sync. : (Do this on both Firewalls)

# set deviceconfig setting session tcp-reject-non-syn yes
# commit


Re-Enable preempt configuration change must be committed on both peers. To re-enable preempt, go to Device > High Availability > Election Settings and uncheck Preemptive.  Then, perform a commit.


How to Downgrade

If an issue occurs on the new version and a downgrade is necessary:

To revert to the previous PAN-OS screen, run the following CLI command:

# debug swm revert

This causes the firewall to boot from the partition in use prior to the upgrade. Nothing will be uninstalled and no configuration change will be made.


However please be aware while running this command –

After rebooting from a SWM revert, the configuration active at the time before upgrade will be loaded with the activation of the previous partion. Any configuration changes made after upgrade will not be accounted for and will need to be manually recovered by loading the latest configuration version and committing the changes.
Open Gear : Basic Commands

Here are some basic commands to help you get around when using Open Gear Terminal Server. These devices are incredibly useful for accessing Network Devices Out of Band. On the newer models you can use them with Cellular Access and a Static IP, so when your Device or Network goes down you can still access your devices Out of Band. 

To view all ports

pmshell

To exit from one device

~. <Enter>

$ pmshell

(standard user)

or

# pmshell

(root user)


For example, enter a device to be managed:

2: CISCOASA   3: CISCOSWITCH   4: CISCOROUTER

> 3

Once the selection has been made, type one of the following selections:

CISCOASA> ~?  (Note: Typing this ESCAPE sequence should not be visible for this to work. Should you start to see typing, hit enter 1-2 times to refresh)

Help Menu: ~~?     —>  double tilde is required for ALL OpenSSH based terminals (Mac & Linux)

Shell Commands:

~b – Generate BREAK

~h – View history

~p – Power menu

~m – Connect to port menu

~. – Exit pmshell

~? – Show this message


PMSHELL Command Breakdown:

~b –> (BREAK sequence) often used in device recovery situations.

~h –> recent port history of RX/TX operations

~p –> (optional) if a managed PDU has been configured, the device would have the ability to pull-up the power menu directly from the device.

~m –> at any point when connected to an active console session, this will return you back to the main pmshell selection menu.

~. –> (tilde period)  exit the pmshell system when actively connected to a console session.

~? –> displays pmshell command usage information.