Add Device
Settings > Manage Nodes > Add Node > Follow the Wizard.
Edit Node
Find Device > Edit Node > NCM Properties
Configurations Normally download to : \SolarWinds\Orion\NCM\Config-Archive


Where Packets can be made to stand up and dance.
Add Device
Settings > Manage Nodes > Add Node > Follow the Wizard.
Edit Node
Find Device > Edit Node > NCM Properties
Configurations Normally download to : \SolarWinds\Orion\NCM\Config-Archive
To Enable IPv6 on the Firewall
Web GUI
IPv6 firewalling is enabled under Device > Setup > Session:
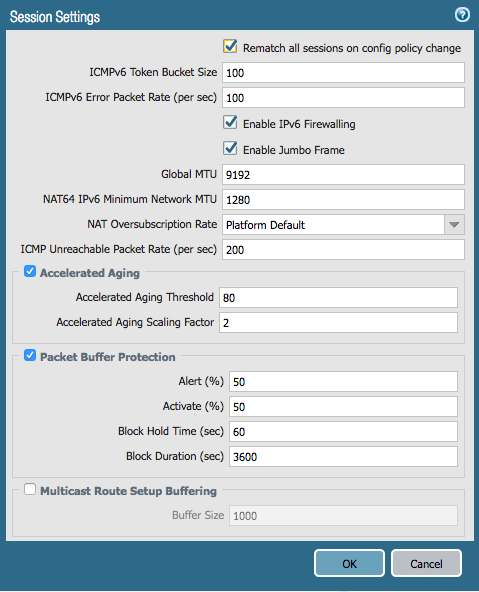
*** You may have to restart your Firewall for IPv6 to be enabled.
On the CLI
> configure
# set deviceconfig setting session ipv6-firewalling [yes|no]
# commit
Here is the interface configuration I used:
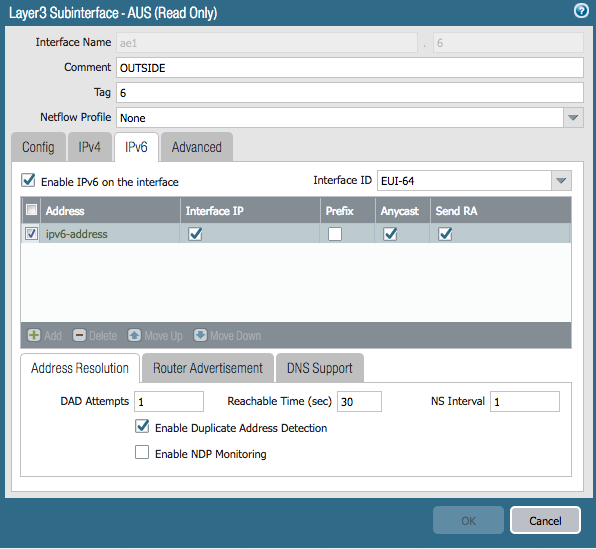
Don’t forget to add a rule in your security policy that allows Your new IPv6 interface to talk to your Gateway.
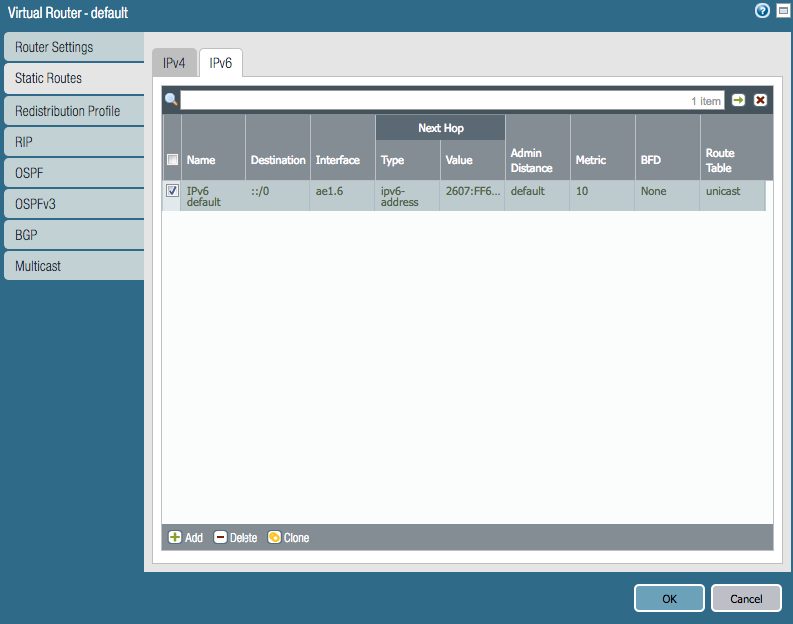
Add Default Route
You will also have to add a default route under Network > Virtual Routers > Default > Static Routes > IPv6
The default route for IPv6 is ::/0 the next hop is the default gateway address
I only use SuperPutty with GNS3, here is how.
This install is intended for running IOU/IOL images on the GNS3 VM because it is the preferable way of running IOS in GNS3 now.
Pre-Requisites:
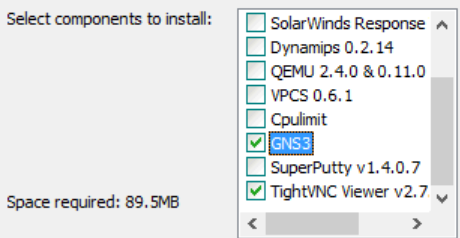
Install GNS3:
Install Loopback Adapter
cd “c:\Program Files\gns3”
loopback-manager.cmd
Setup GNS3 VM:
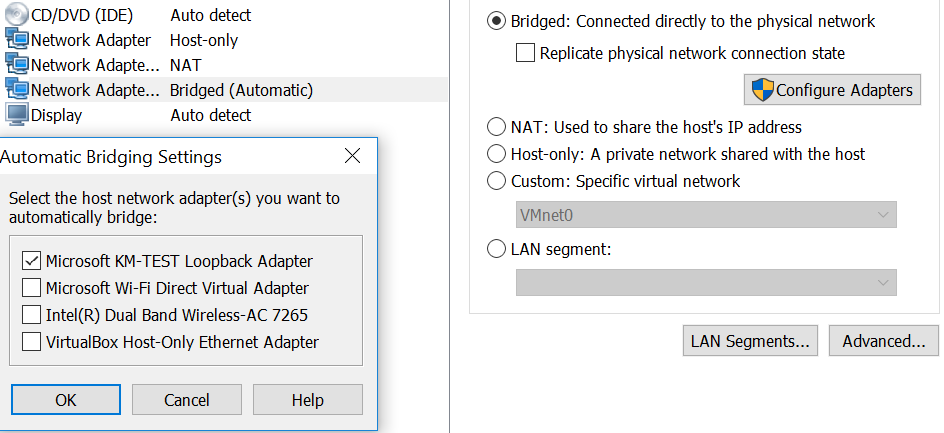
Configure GNS3 to use the GNS3 VM server:
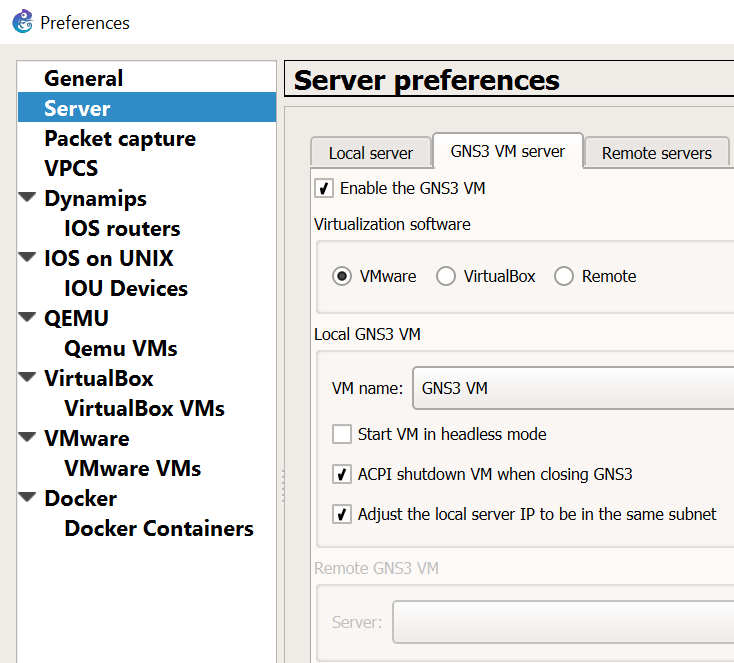
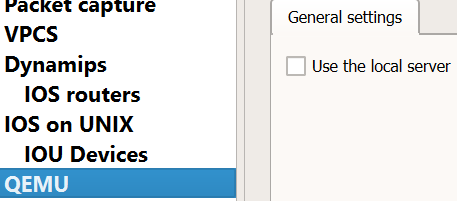
Disable “Use of the local server” for Dynamips and QEMU. We’ll use the GNS3 VM instead for running those processes.


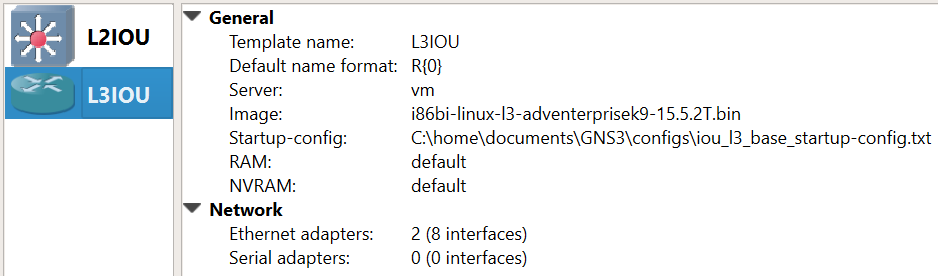
Create the L2/L3 IOU Devices:

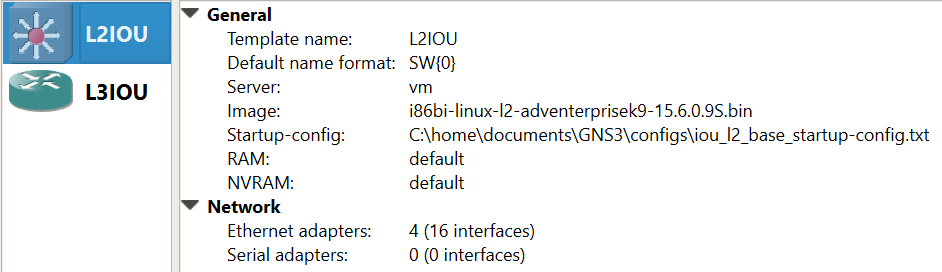

Add Device Image
New appliance template > Add and IOU > Run the IOU > New Image > Browse
i86bi-linux-l2-ipbasek9-15.1e.bin – IOU-L2
i86bi-linux-l3-adventerprisek9-15.4.2T.bin – IOU-L3
Operational Notes:
If you want to use SuperPutty as the SSH client for GNS3 click this link:
SuperPutty with GNS3
Logging your session when doing any kind of network work is very important and can save your ass. It has saved mines on multiple occasions. One reason is it allows you to look back and see what you may have done wrong, so you can troubleshoot a issue more effectively. Other reasons are it give you the user a quick way to backup a device if you show the configuration file when working on it. I make it a habit of showing the configuration file before I do any work, so I always have a back out strategy incase something goes wrong.
SecureCRT Logging
Options > Edit Session Defaults
File path to where you are storing your logs /Logs/%M-%D-%Y/%S (%H) — %h-%m.log
Start Log Upon Connect
Append to File
Start recording S (%H) – %h:%m:%s
Stop recording S (%H) – %h:%m:%s
Happy Logging!
|
Task |
Cisco |
Brocade |
|
Configure a VLAN |
Interface vlan 2 |
Vlan 2 |
|
Configure a trunk port |
Int fa0/1 Switchport trunk encap dot1q Switchport mode trunk |
Vlan 2 Tagged eth 0/1/1 Vlan 3 Tagged eth 0/1/1 Vlan 4 Tagged eth 0/1/1 Interface ethernet 0/1/1 Dual-mode 1 |
|
Configure a access port |
Int fa0/1 Switchport access vlan 2 |
Vlan 2 Untagged eth 0/0/1
|
|
Configure an IP address on a VLAN |
Int vlan2 Ip address 192.168.1.1 255.255.255.0 |
Vlan 2 Router interface ve 1 Interface ve1 Ip address 192.168.1.1 255.255.255.0 |
|
Configure a range of ports |
Int range fa0/1-10 |
Int eth 0/1/1 to 0/1/5 |
|
Configure a port for both voice and data vlans |
Int fa0/1 Switchport access vlan2 Switchport voice vlan3 |
vlan2 Tagged eth 0/1/1 vlan3 Tagged eth 0/1/1 Inter eth 0/1/1 Dual-mode 1 Voice-vlan 3 Inline power |
|
Show the interface status of a port/vlan |
Sh int fa0/1 |
Show int eth 0/1/1 |
|
See CDP Neighbors |
Show cdp neighbors |
Show fdp neighbors |
Since I started this blog a few weeks ago, I have not been able to post once per week as I would have liked, there have been a number of reasons, mostly though, time.
I have been working like a maniac at work and learning a bunch of new stuff, which in turn will provide some awesome blog material. I hope to finish up writing these in the next week or so between work travel to Montreal, A full week of Palo Alto Firewall Training and another 2 week work trip to Australia.
Upcoming blog material will include : Palo Alto and Amazon Web Services AWS (which I spent 2 weeks working on and configuring). All very fascinating stuff.